AI Image Editor Online
Transform Knox Chat into a professional-grade AI image editor powered by Google's Gemini models. Edit images using natural language, apply artistic styles instantly, track your editing history, and leverage AI-powered suggestions - all in your browser.
:::info Why Choose Knox AI Image Editor?
- Natural Language Editing - Describe edits instead of clicking buttons
- 30+ Professional Styles - One-click artistic transformations
- Edit History - Never lose a good version
- Smart AI Suggestions - Context-aware recommendations
- Keyboard Shortcuts - Lightning-fast workflow
- 100% Web-Based - No installation required :::
Getting Started
Step 1: Select a Gemini Image Model
Knox AI Image Editor works exclusively with Google's Gemini image generation models, a.k.a. "Nano Banana" or "Nano Banana Pro":
google/gemini-2.5-flash-image(Recommended)google/gemini-2.5-flash-image-previewgoogle/gemini-3-pro-image-preview
These models support:
- ✅ Image generation
- ✅ Image editing
- ✅ Multi-turn conversations
- ✅ Image understanding
Step 2: Generate Your First Image
Simply describe what you want to create:
Create a portrait of a woman with long dark hair,
professional studio lighting, modern style
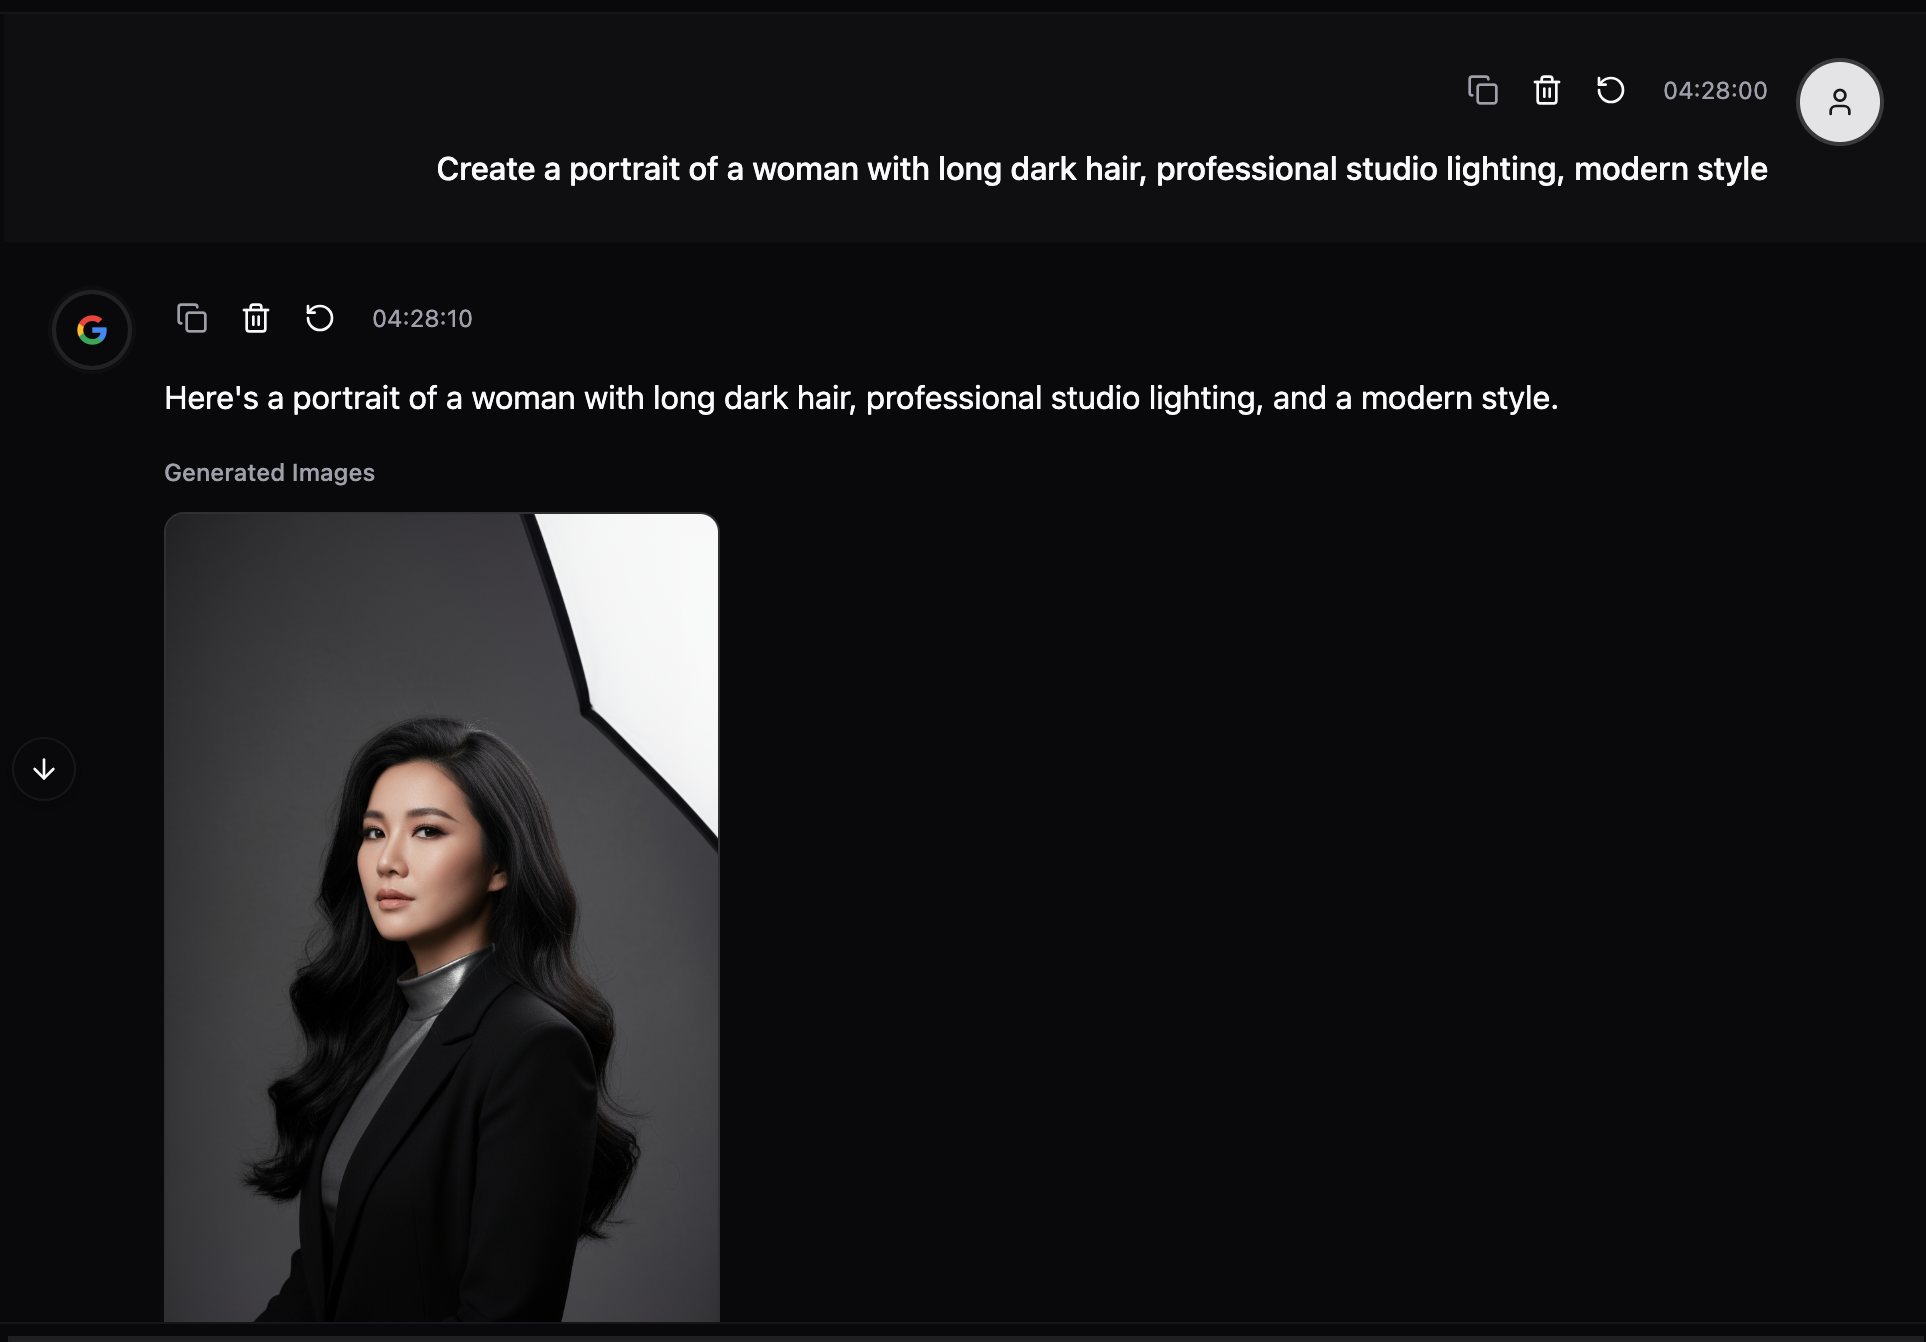 |
|---|
Step 3: Start Editing
Once an image is generated, all editing tools become available:
- Quick Edit Commands
- Style Transfer Gallery
- Smart Suggestions
- Edit History Timeline
- Image Gallery
 |
|---|
🛠️ Core Features
1. Quick Edit Commands
10 preset editing commands for common image transformations.
Available Commands:
| Command | Description | Best For |
|---|---|---|
| Enhance | Improve overall quality and details | Any image |
| Color Boost | Increase color vibrancy | Flat/dull images |
| Better Light | Professional lighting adjustment | Underlit photos |
| Clean BG | Remove background distractions | Product shots |
| Artistic | Apply creative styling | Portraits |
| Upscale | Improve resolution | Low-res images |
| Change Outfit | Modify clothing | Fashion/Portrait |
| Face Edit | Edit facial features | Portraits |
| Change Weather | Alter atmosphere | Landscapes |
| Change Season | Transform seasons | Nature scenes |
How to Use:
- Click the Wand icon in the toolbar
- Select a command from the panel
- The prompt auto-fills in your input
- Press Enter to apply
Example Workflow:
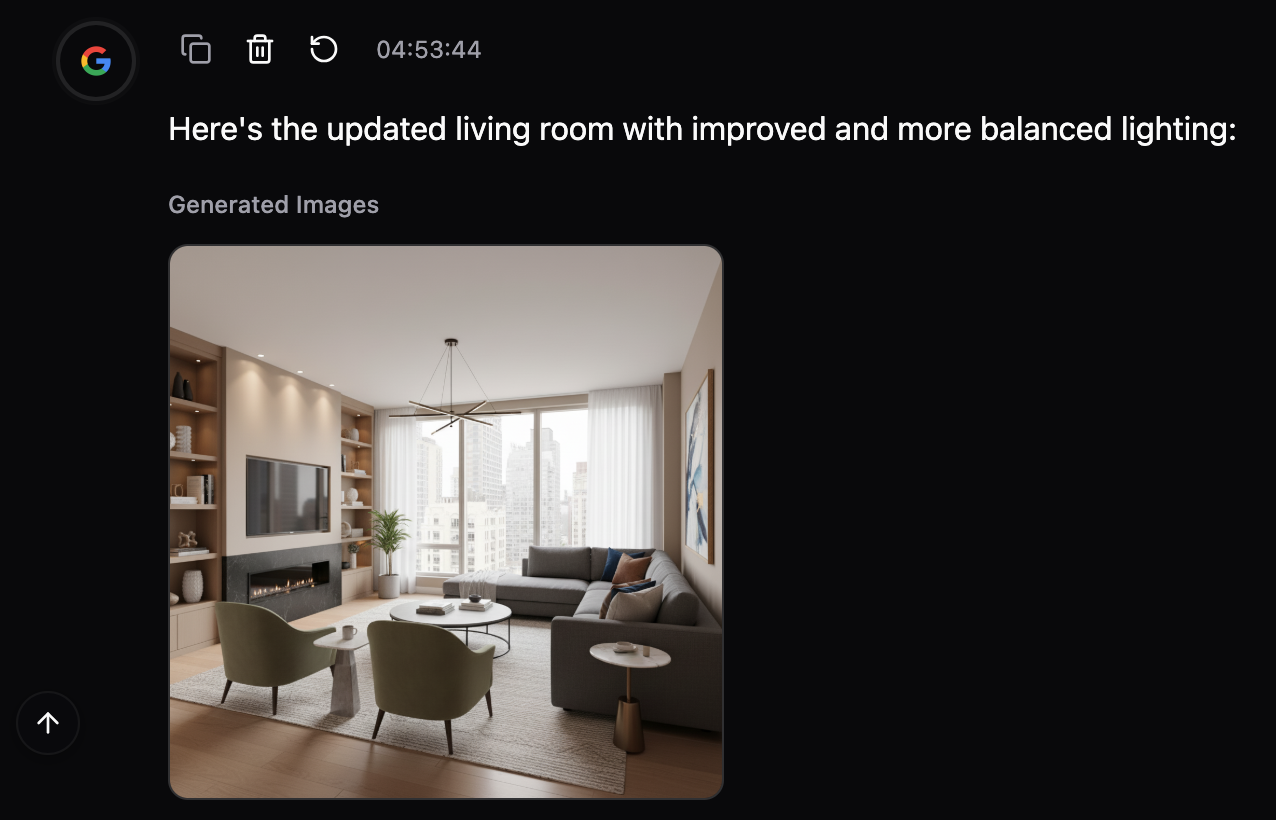
1. Generate: "Modern living room interior"
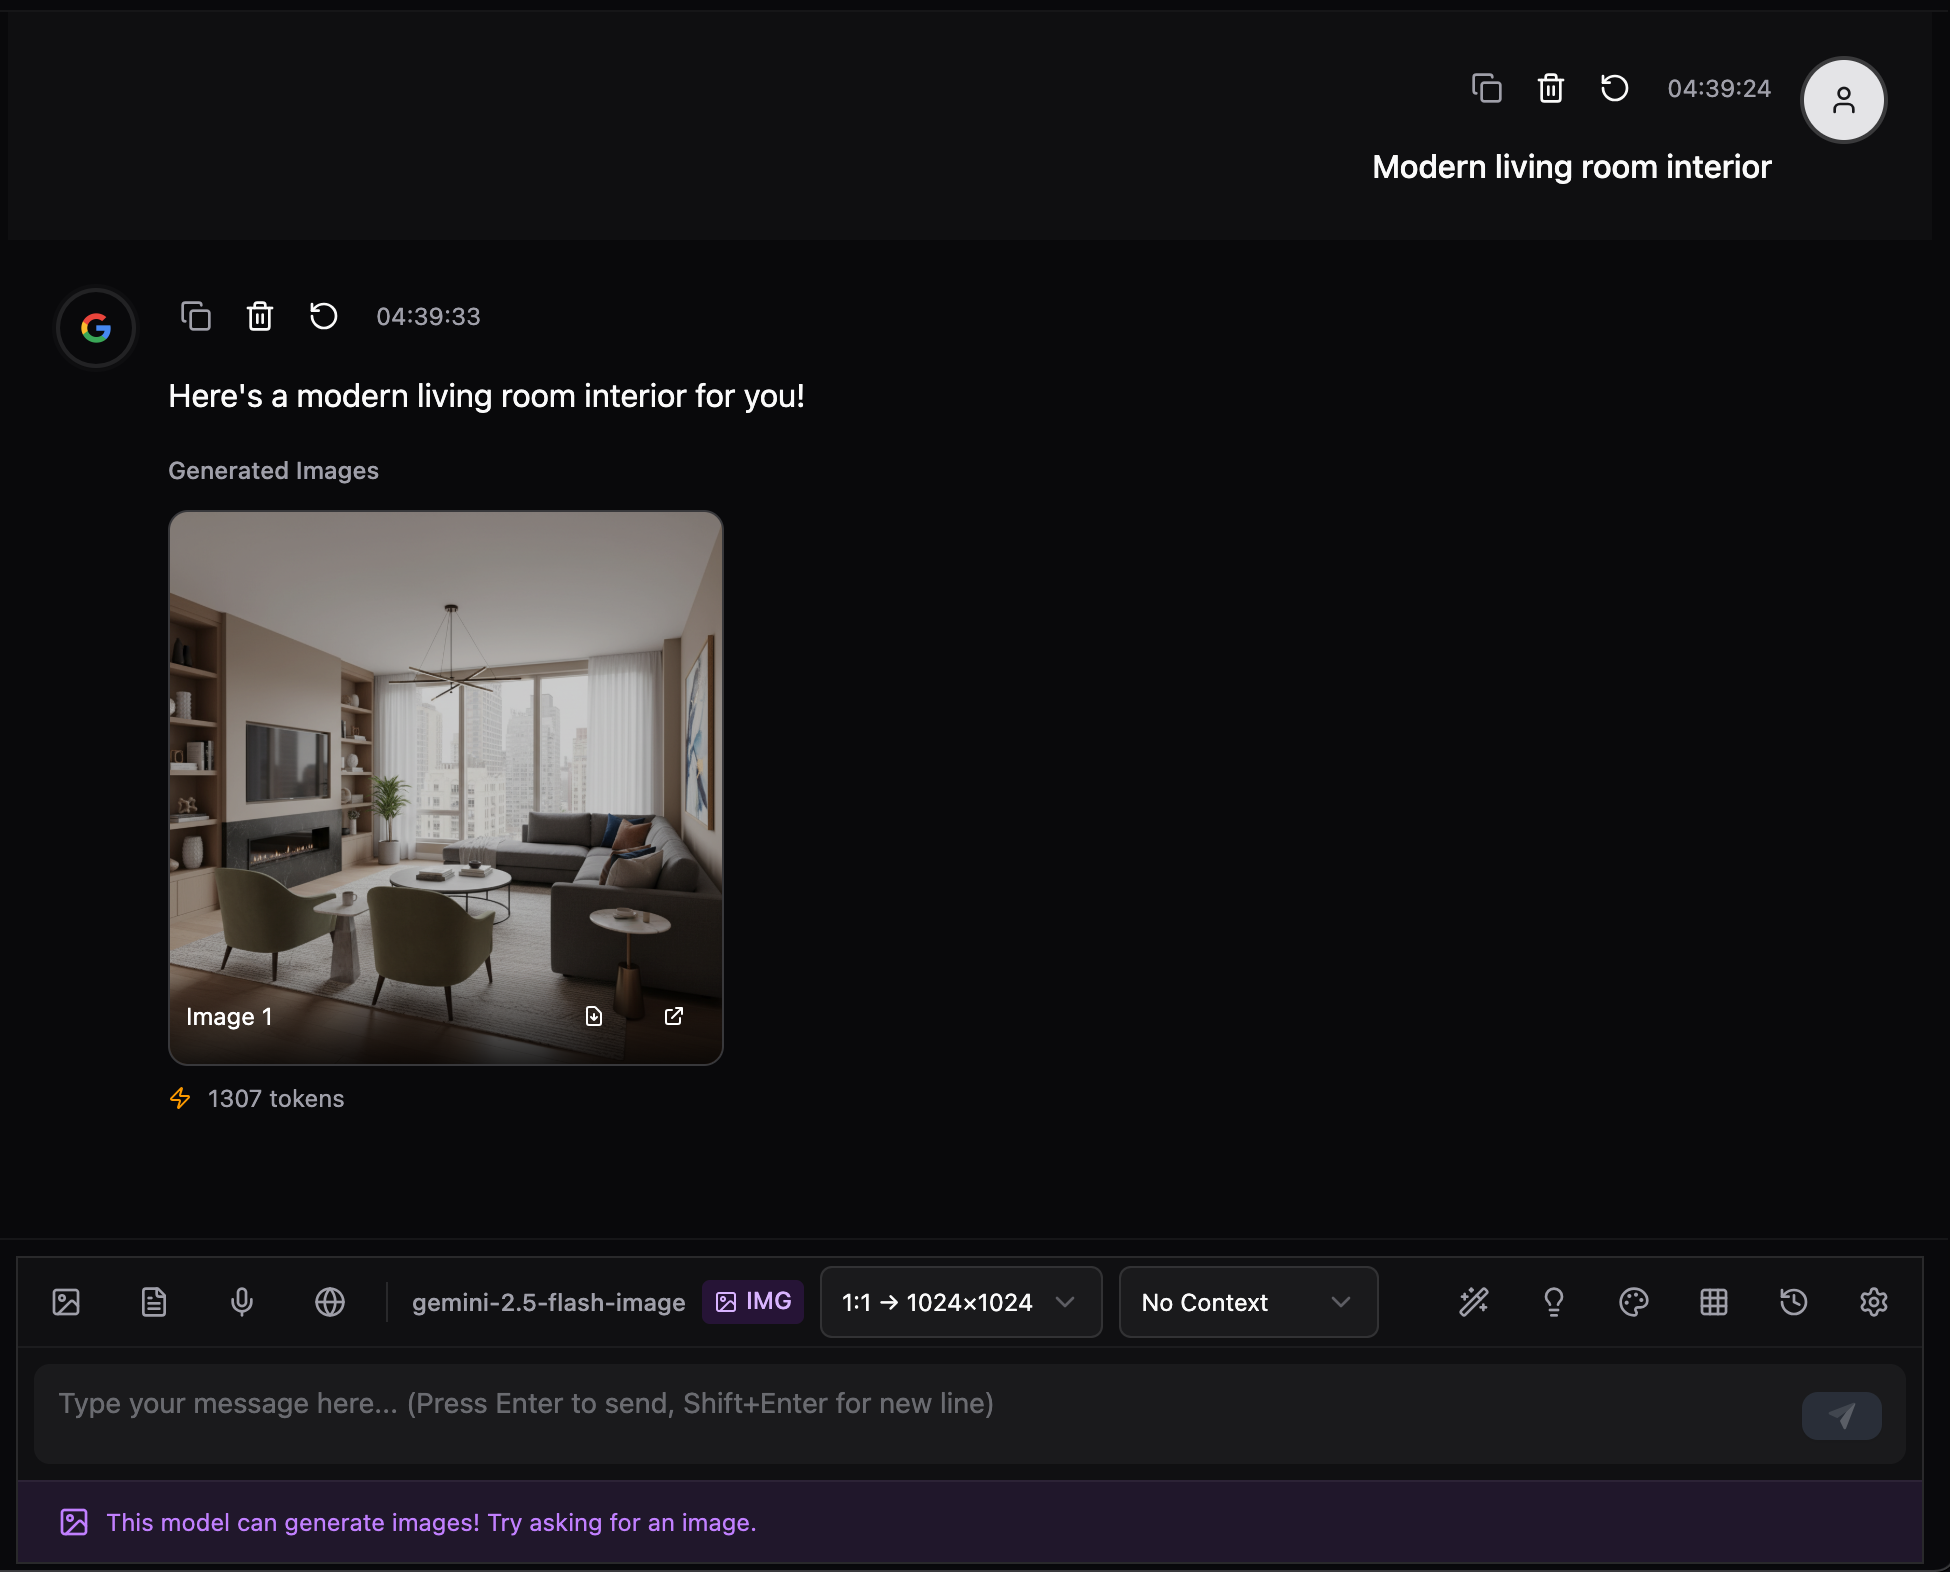 |
|---|
2. Select "Use Previous One" on the toolbar then Click "Better Light" → Enhances lighting
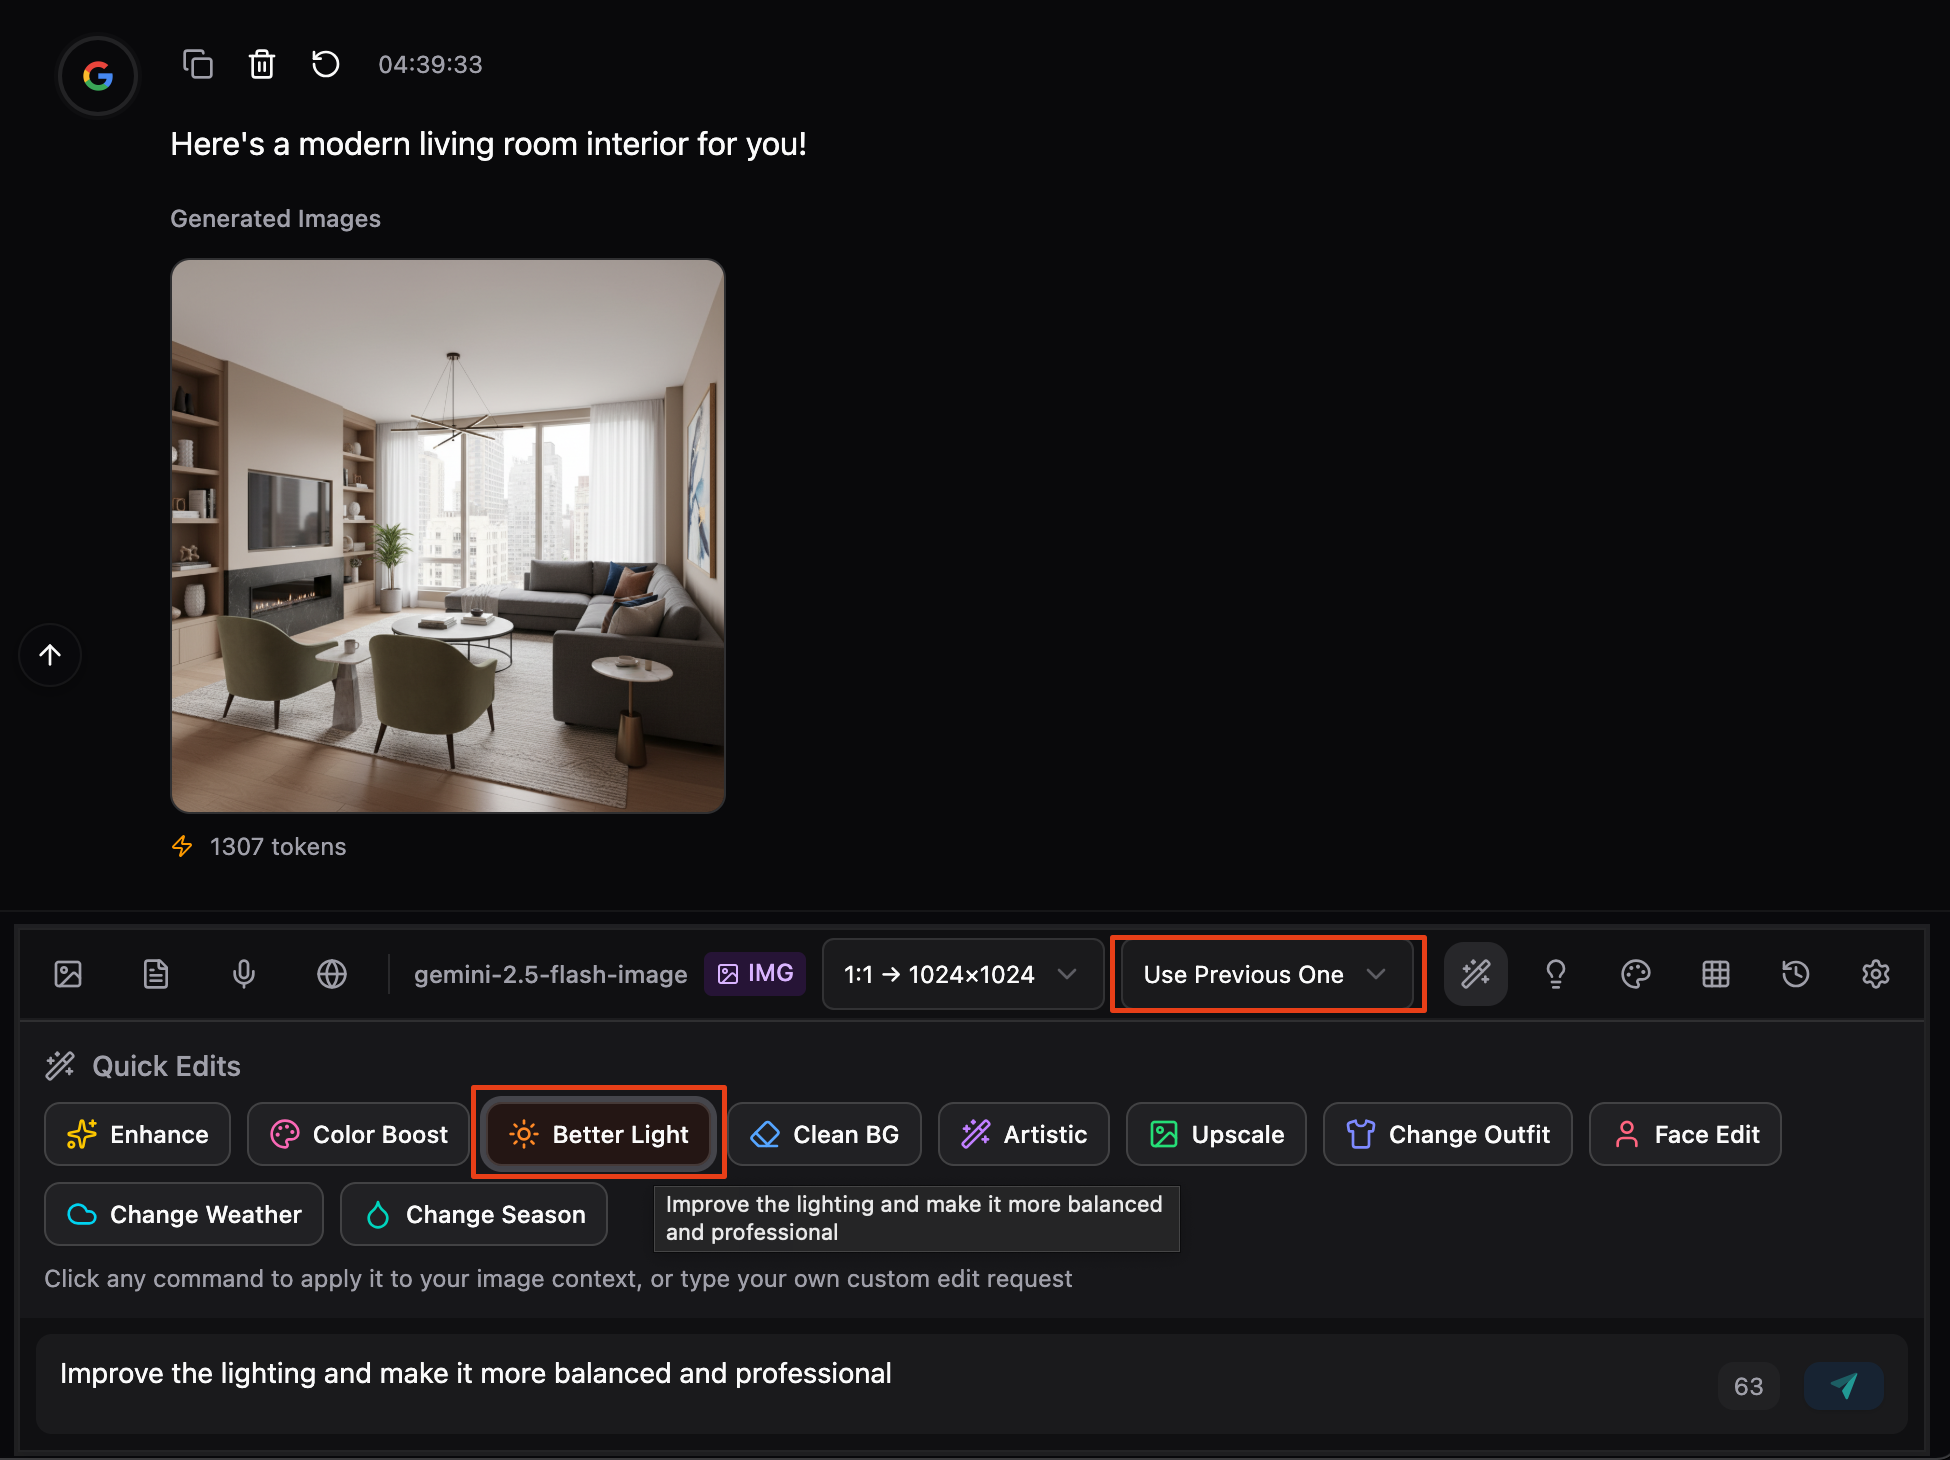 |
|---|
 |
|---|
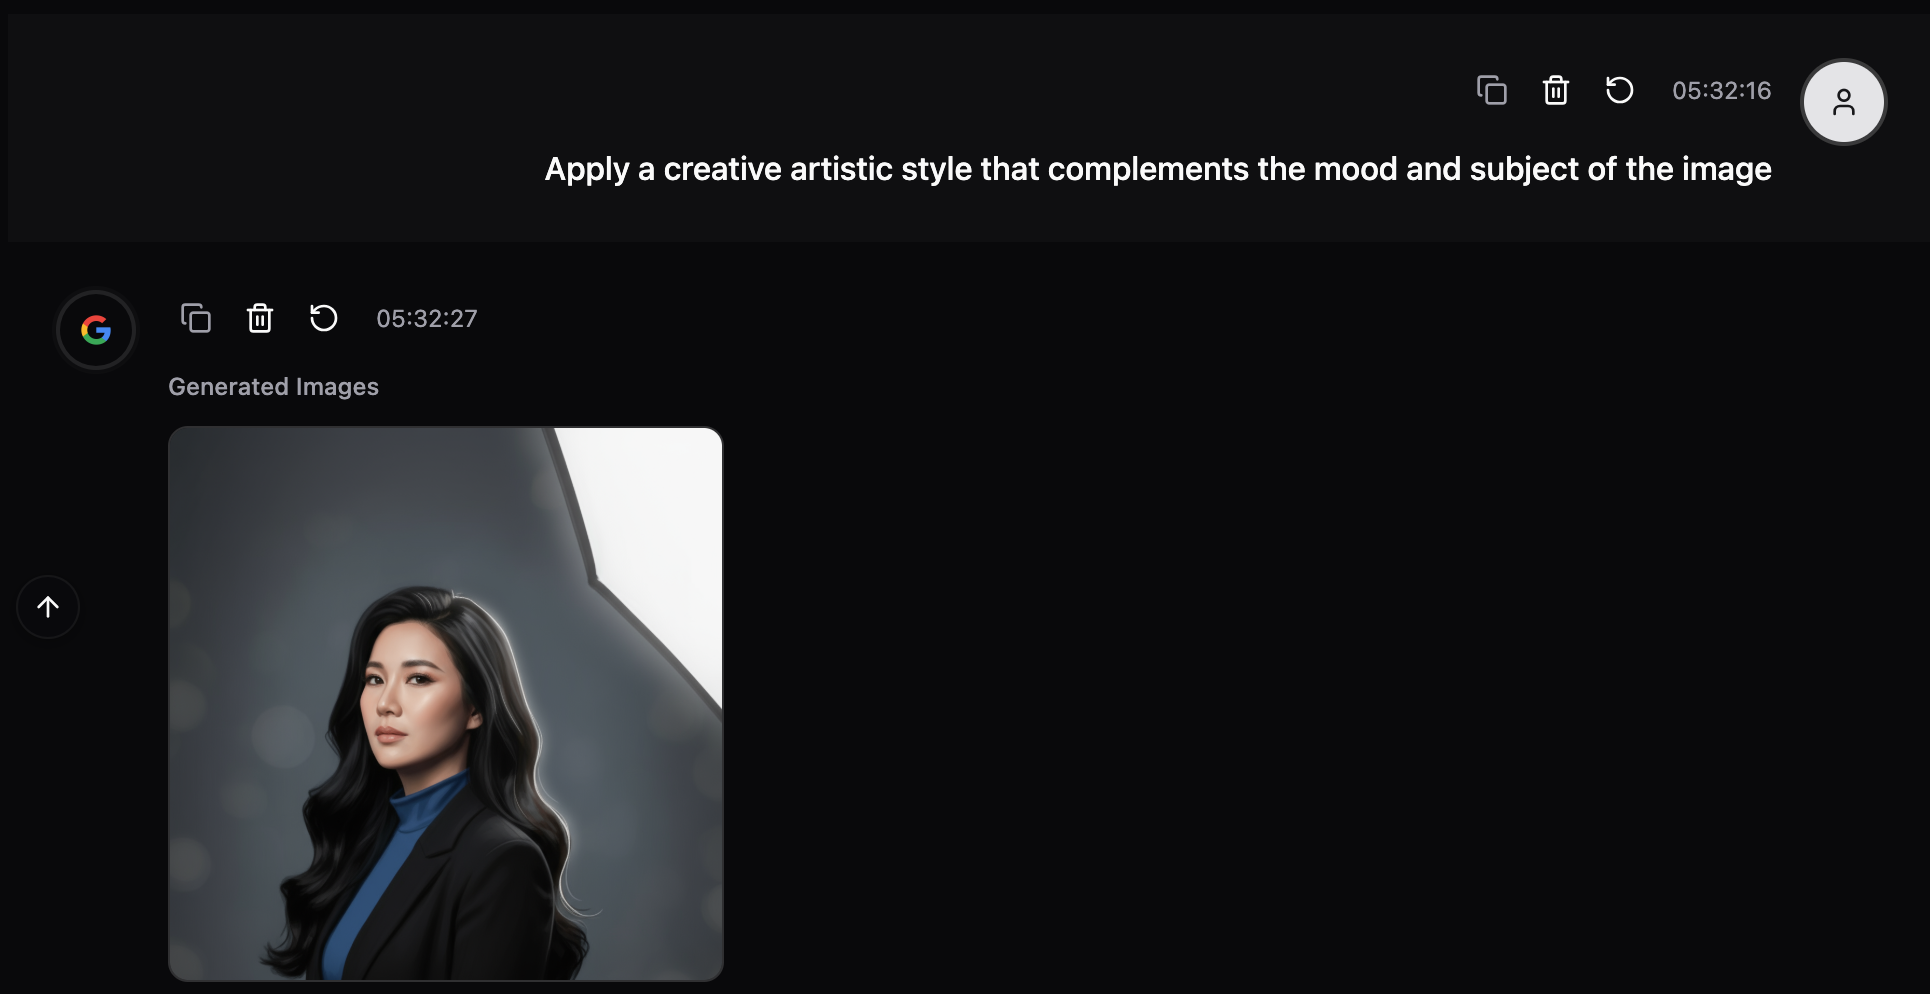
3. Click "Artistic" → Applies creative style
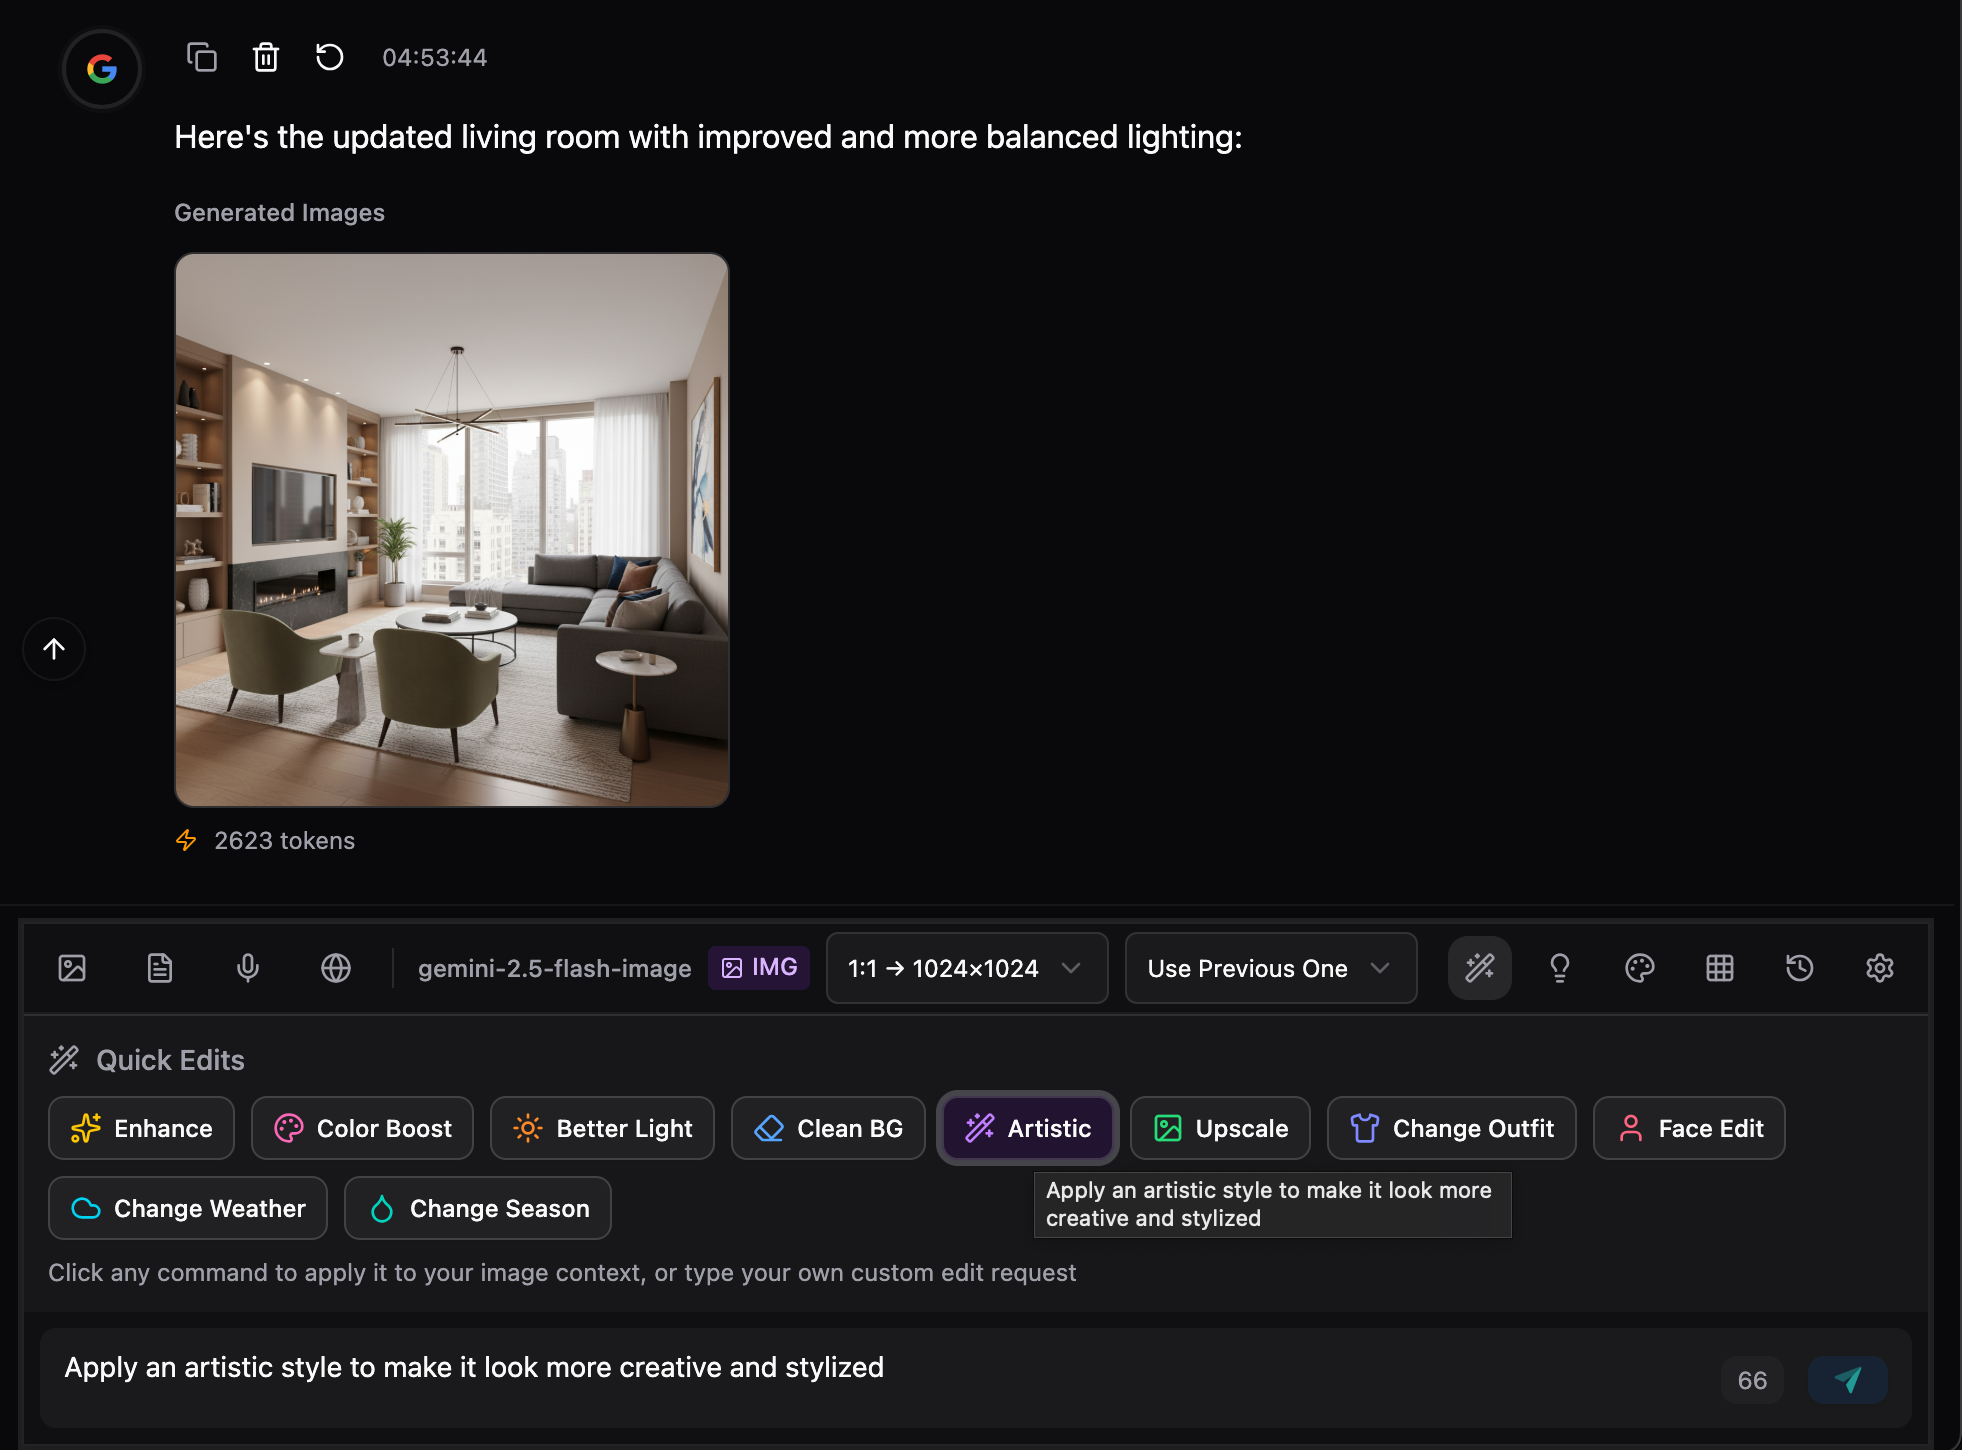 |
|---|
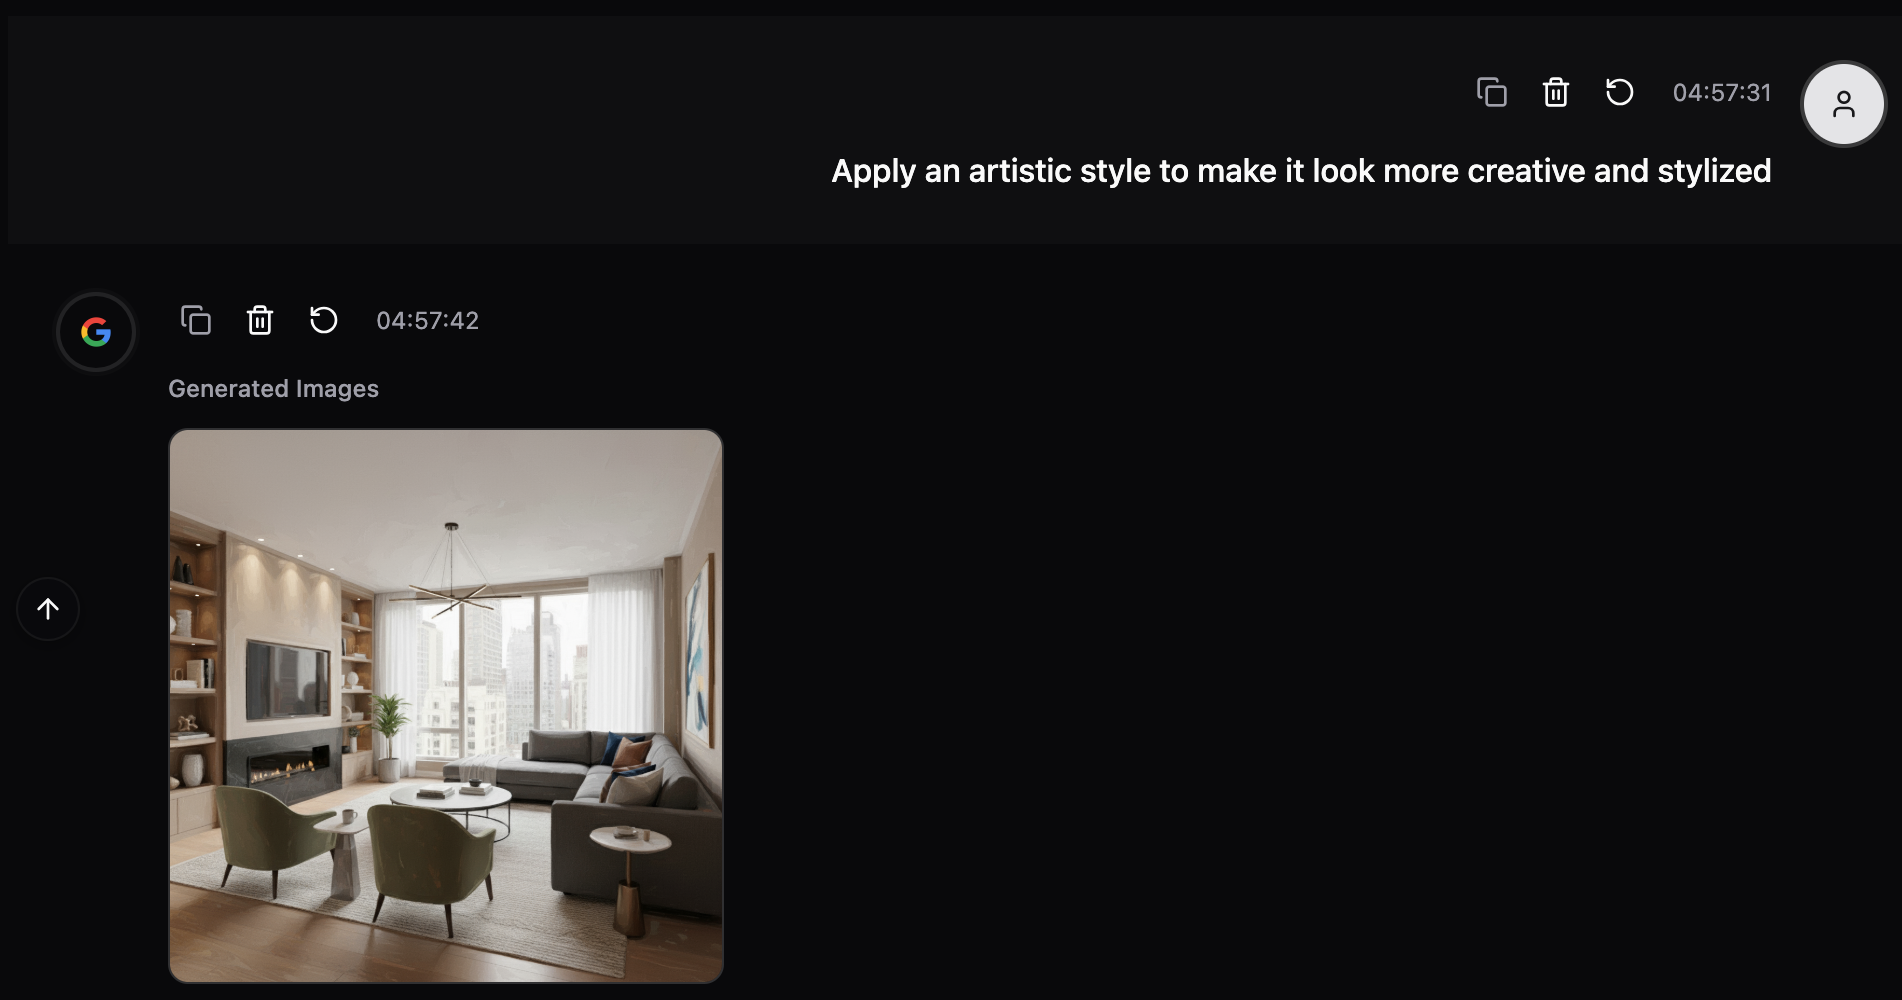 |
|---|
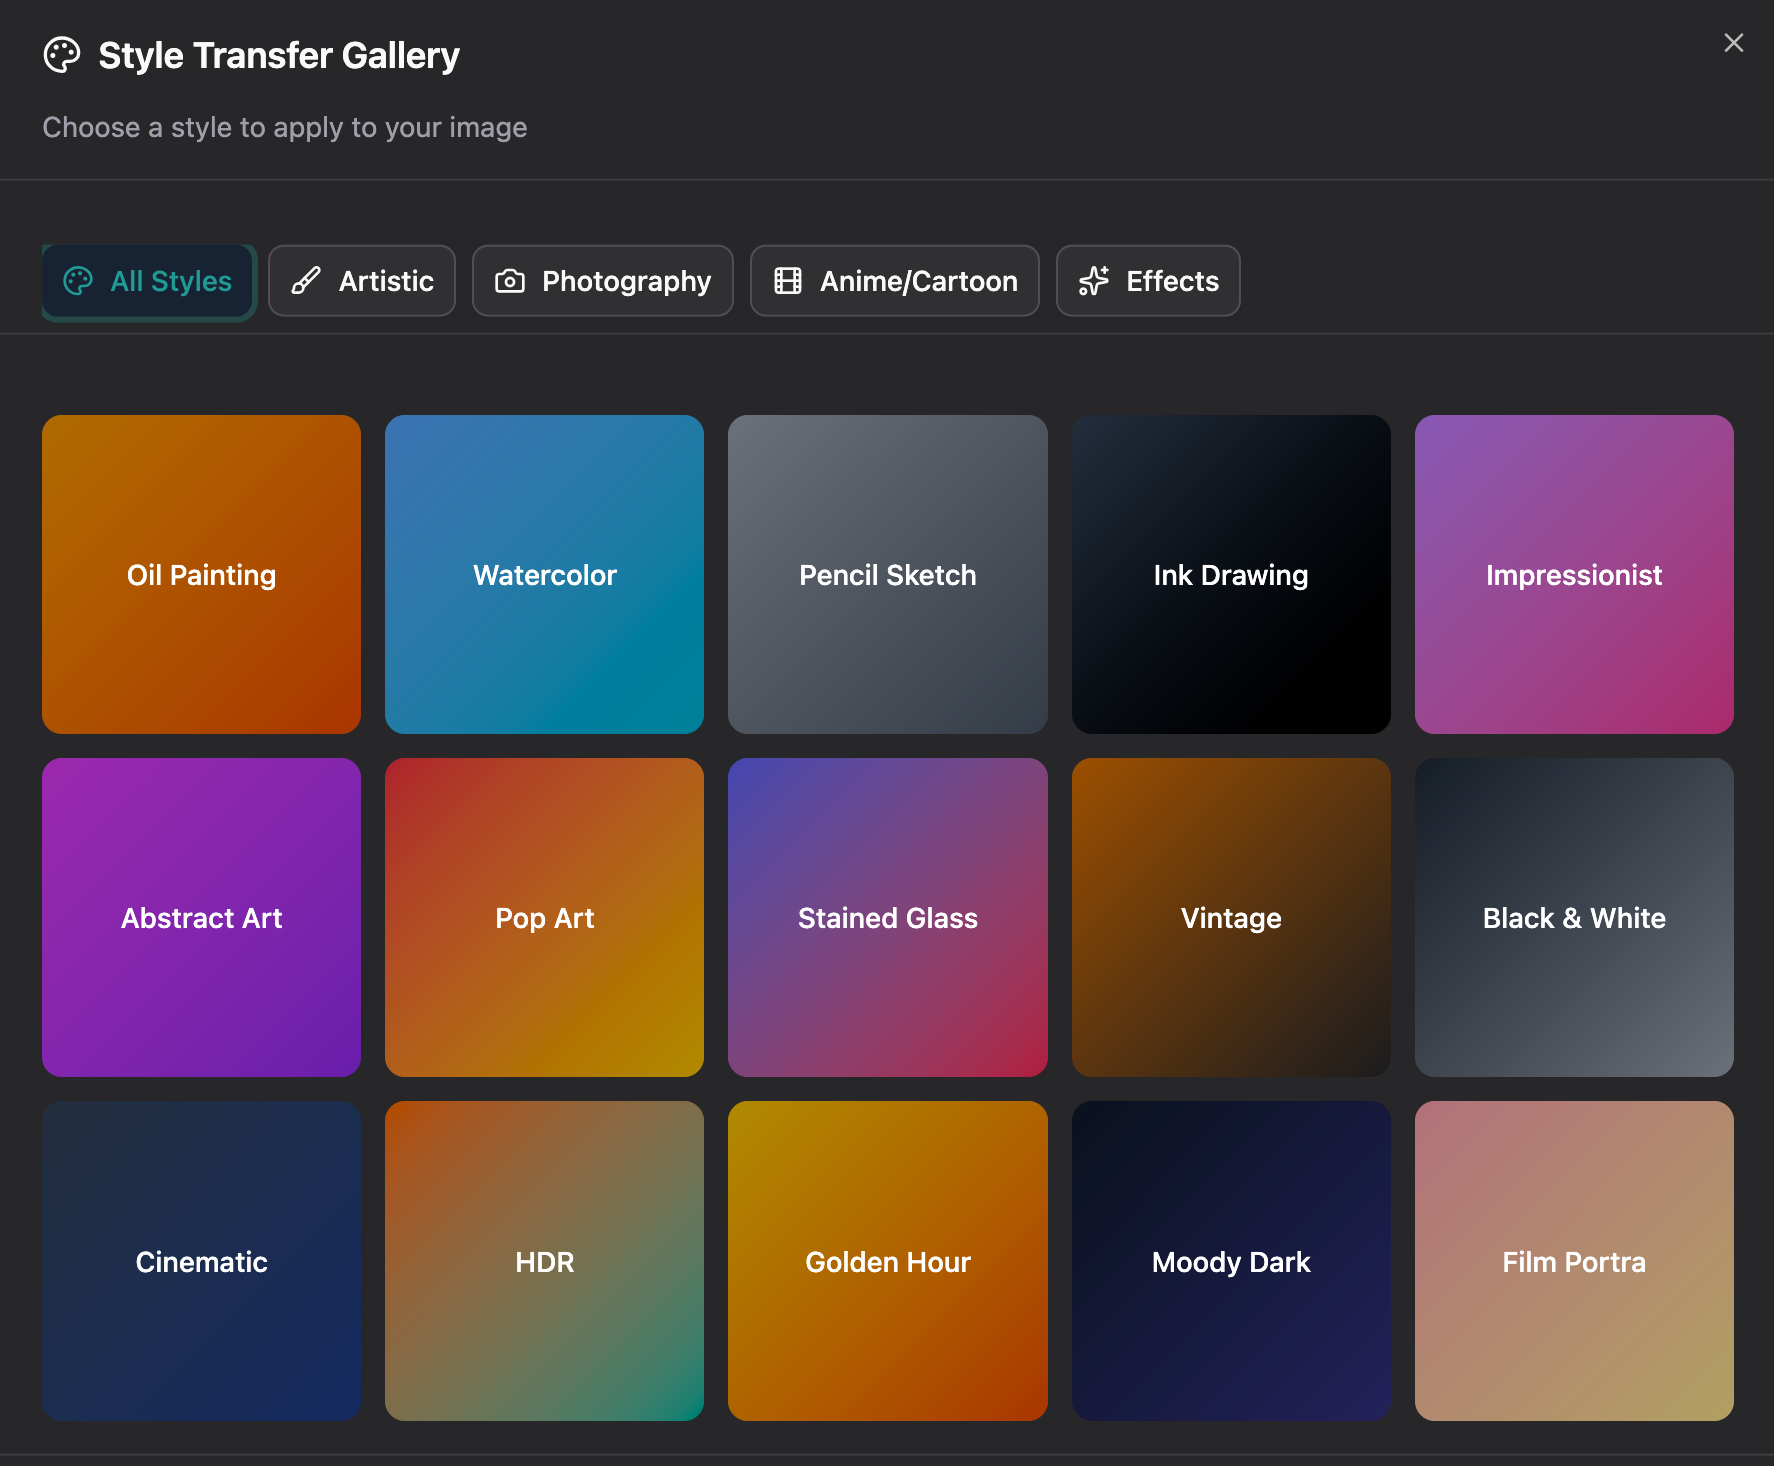
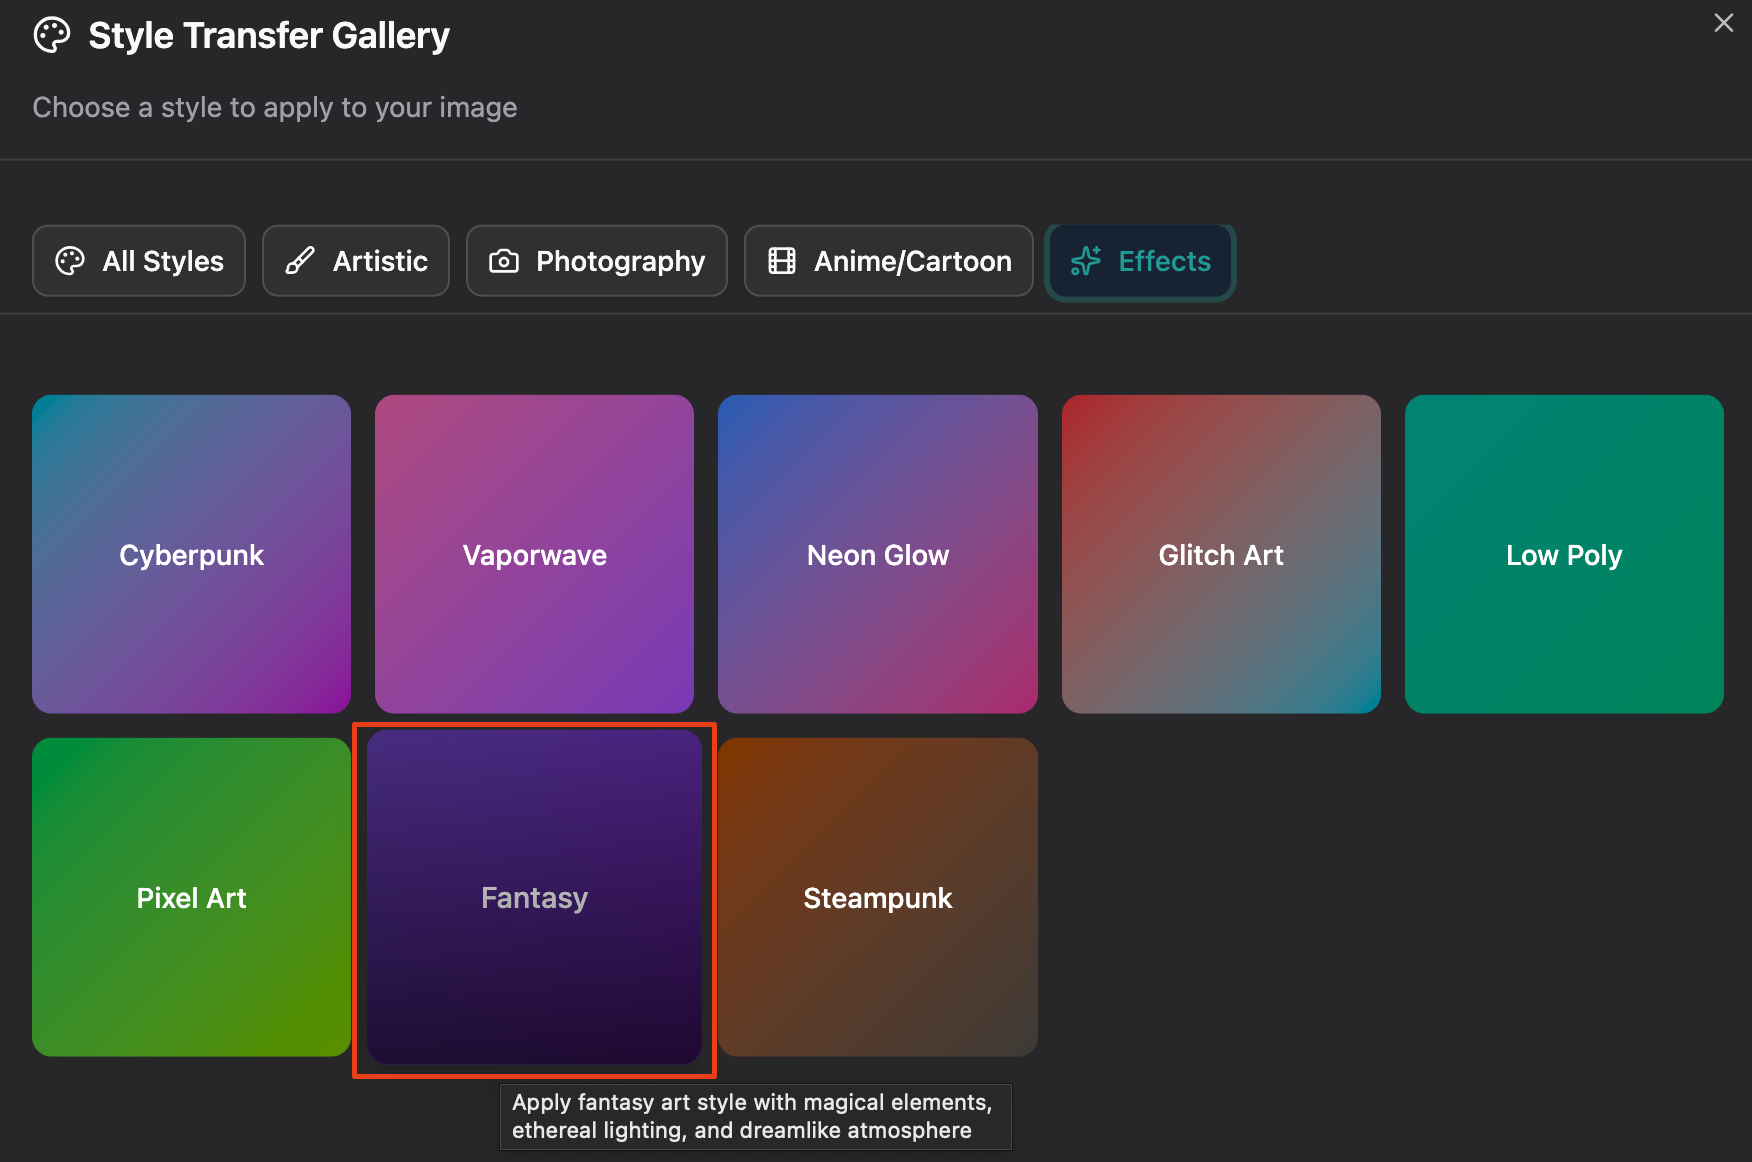
2. Style Transfer Gallery
30+ professional artistic styles across 4 categories.
Artistic Styles (8)
- Oil Painting - Rich brush strokes and colors
- Watercolor - Soft flowing transparency
- Pencil Sketch - Detailed line work
- Ink Drawing - Bold black contrast
- Impressionist - Loose brush strokes
- Abstract Art - Geometric bold colors
- Pop Art - Comic book aesthetics
- Stained Glass - Vibrant segments
Photography Styles (7)
- Vintage - Faded nostalgic film
- Black & White - Classic dramatic tones
- Cinematic - Movie-like color grading
- HDR - Enhanced dynamic range
- Golden Hour - Warm sunset glow
- Moody Dark - Deep shadows
- Film Portra - Natural skin tones
Anime/Cartoon Styles (5)
- Anime - Clean manga aesthetics
- Studio Ghibli - Dreamy hand-drawn
- Cartoon - Playful exaggerated
- Pixar 3D - Smooth cute rendering
- Disney - Magical enchanting
Effects (8)
- Cyberpunk - Neon futuristic
- Vaporwave - 80s/90s retro
- Neon Glow - Electric atmosphere
- Glitch Art - Digital distortion
- Low Poly - Geometric facets
- Pixel Art - 8-bit retro
- Fantasy - Magical ethereal
- Steampunk - Victorian machinery
How to Use:
- Click the Palette icon in the toolbar
- Browse by category or view all
- Click any style to apply
- Prompt auto-fills, press Enter
Keyboard Shortcut: Press S or Cmd/Ctrl+S
 |
|---|
 |
|---|
 |
|---|
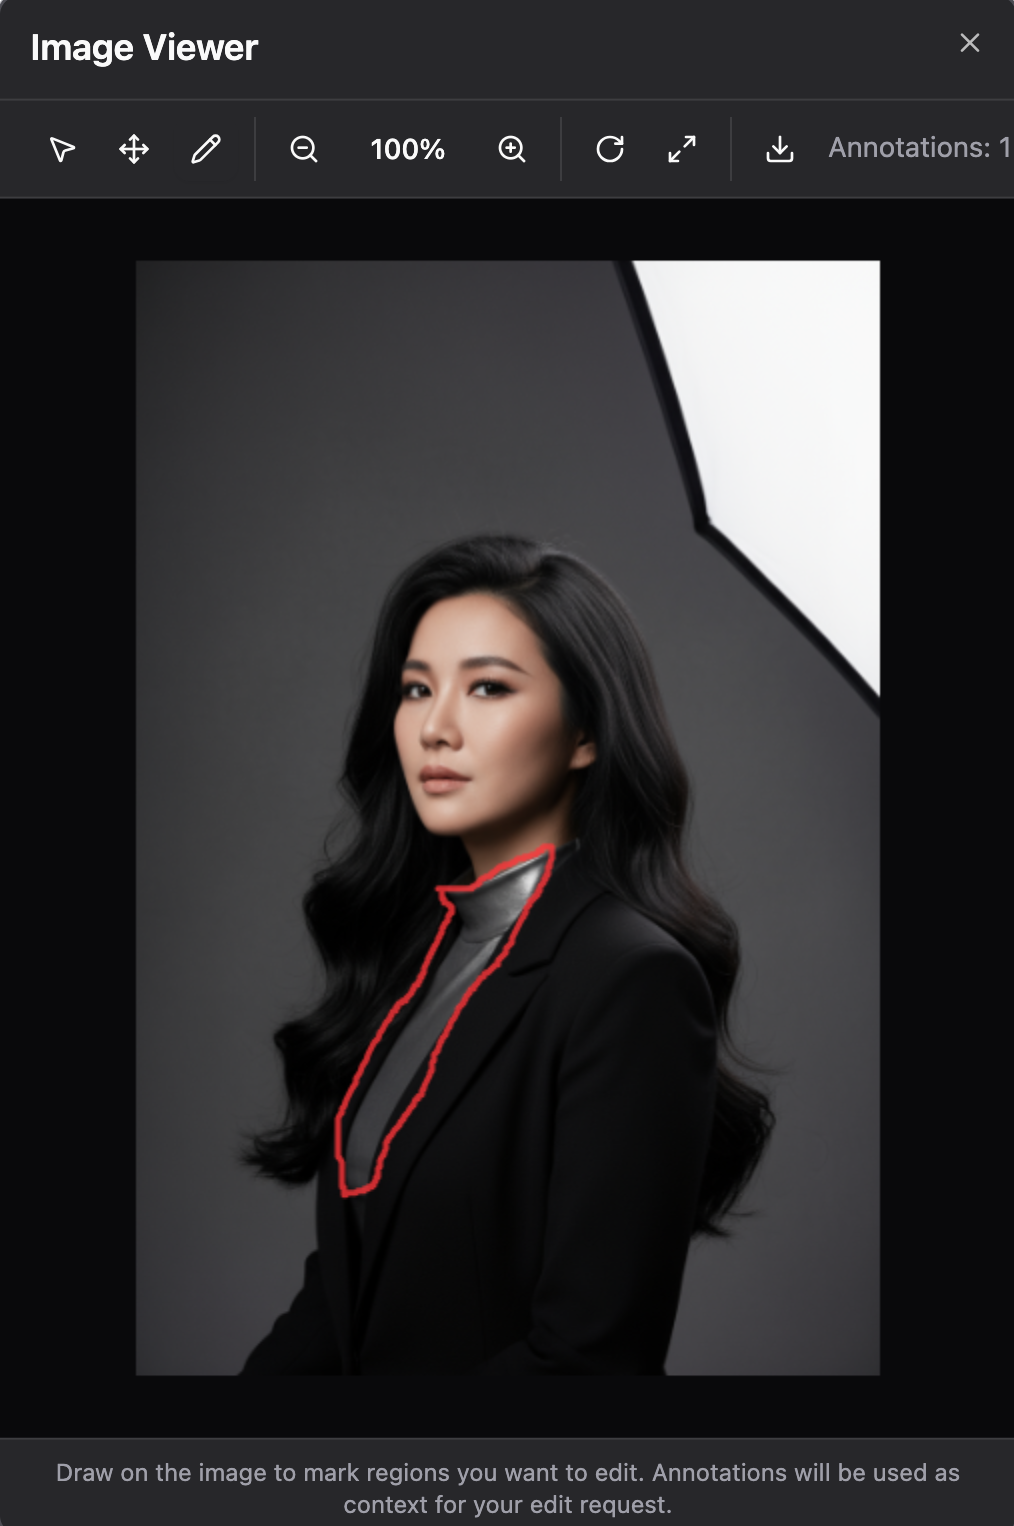
3. Image Viewer & Annotation
Professional image viewer with zoom, pan, and annotation tools.
Features:
Viewing Tools:
- Zoom - Precise zoom control (10%-500%)
- Rotate - 90° rotation
- Pan - Click and drag movement
- Reset - Return to default view
- Scroll Zoom - Mouse wheel zooming
 |
|---|
Editing Tools:
- Pointer - Standard selection
- Pan Mode - Image movement
- Draw Mode - Annotate regions
- Freehand drawing
- Multiple annotations
- Clear all annotations
Actions:
- Download - Save locally
- Open in new tab - Full screen view
 |
|---|
How to Use:
Method 1: Click any generated image to open viewer
Method 2: Use Edit History → Click "View"
Drawing Annotations:
- Open image in viewer
- Select 🖋 Draw tool
- Draw on areas you want to edit
- Close viewer
- Describe your edit (AI focuses on marked regions)
Example:
1. Draw circle around person's shirt
 |
|---|
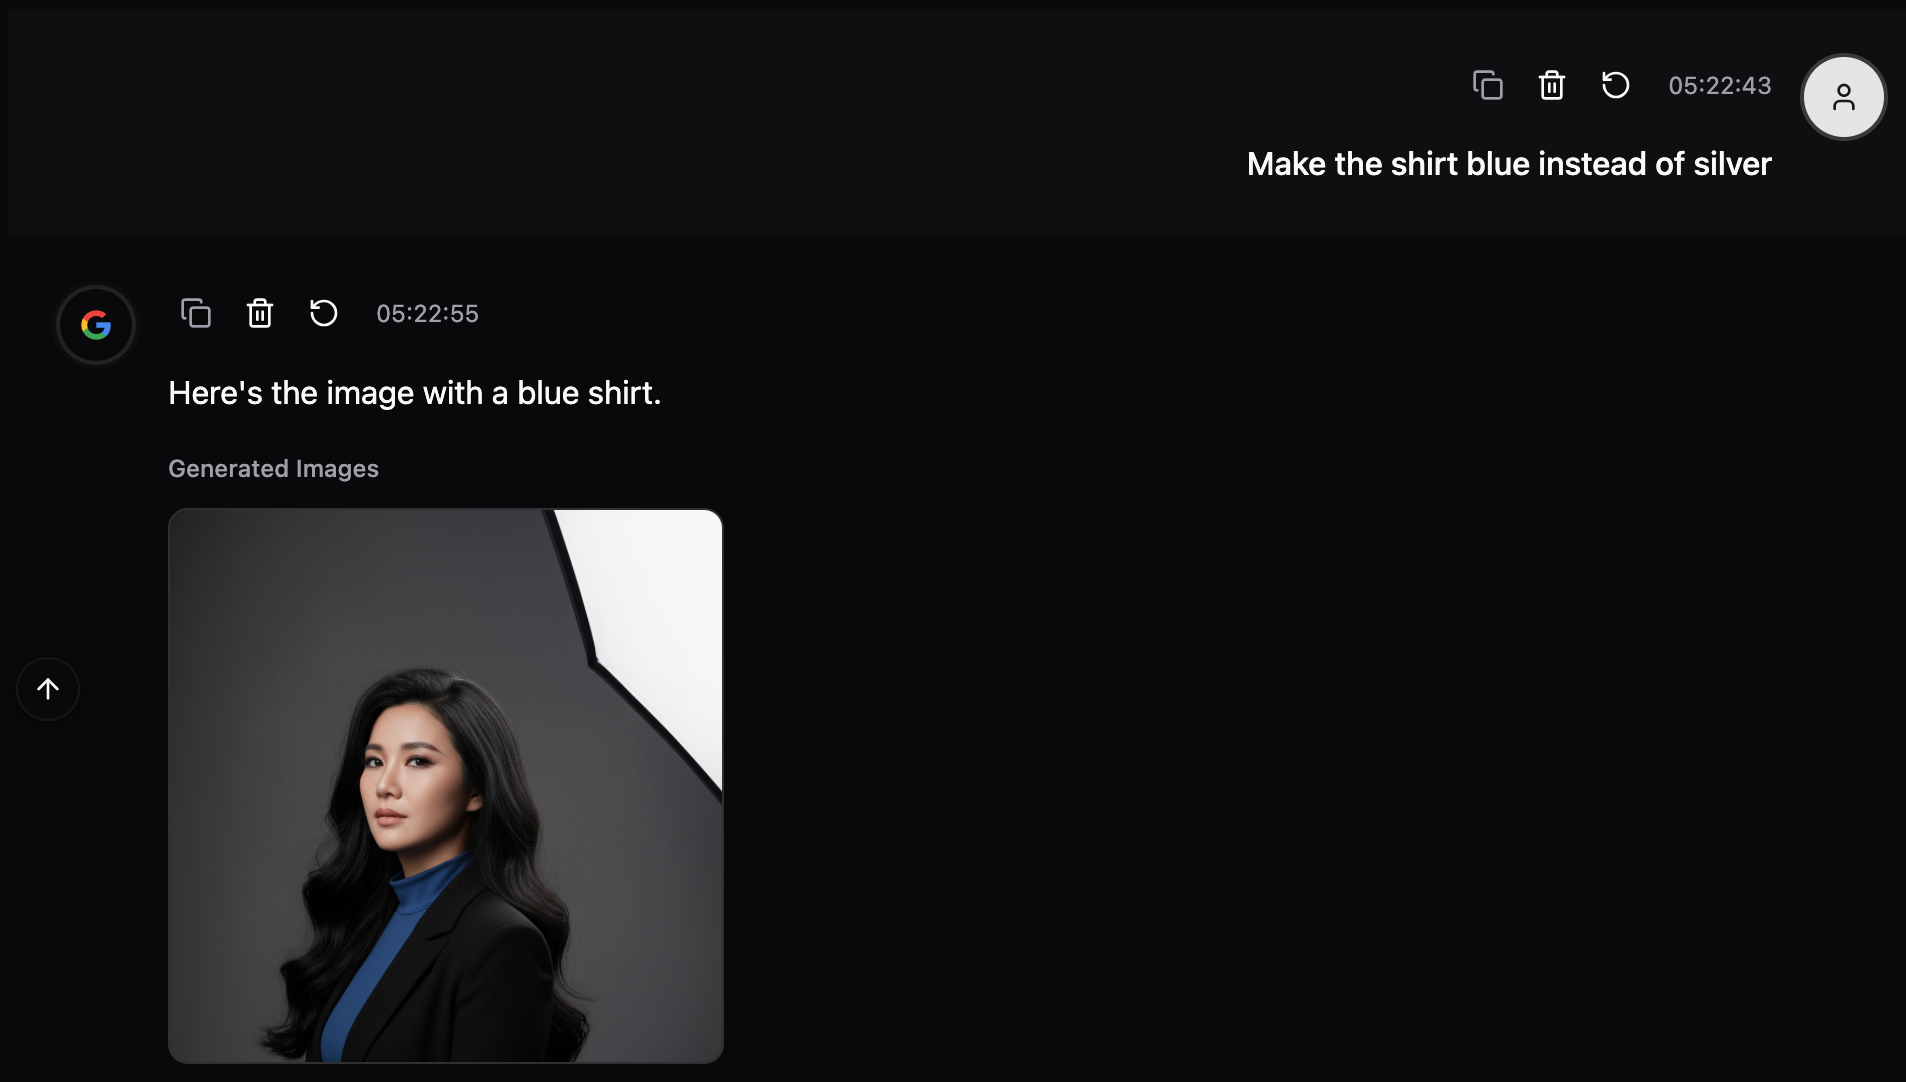
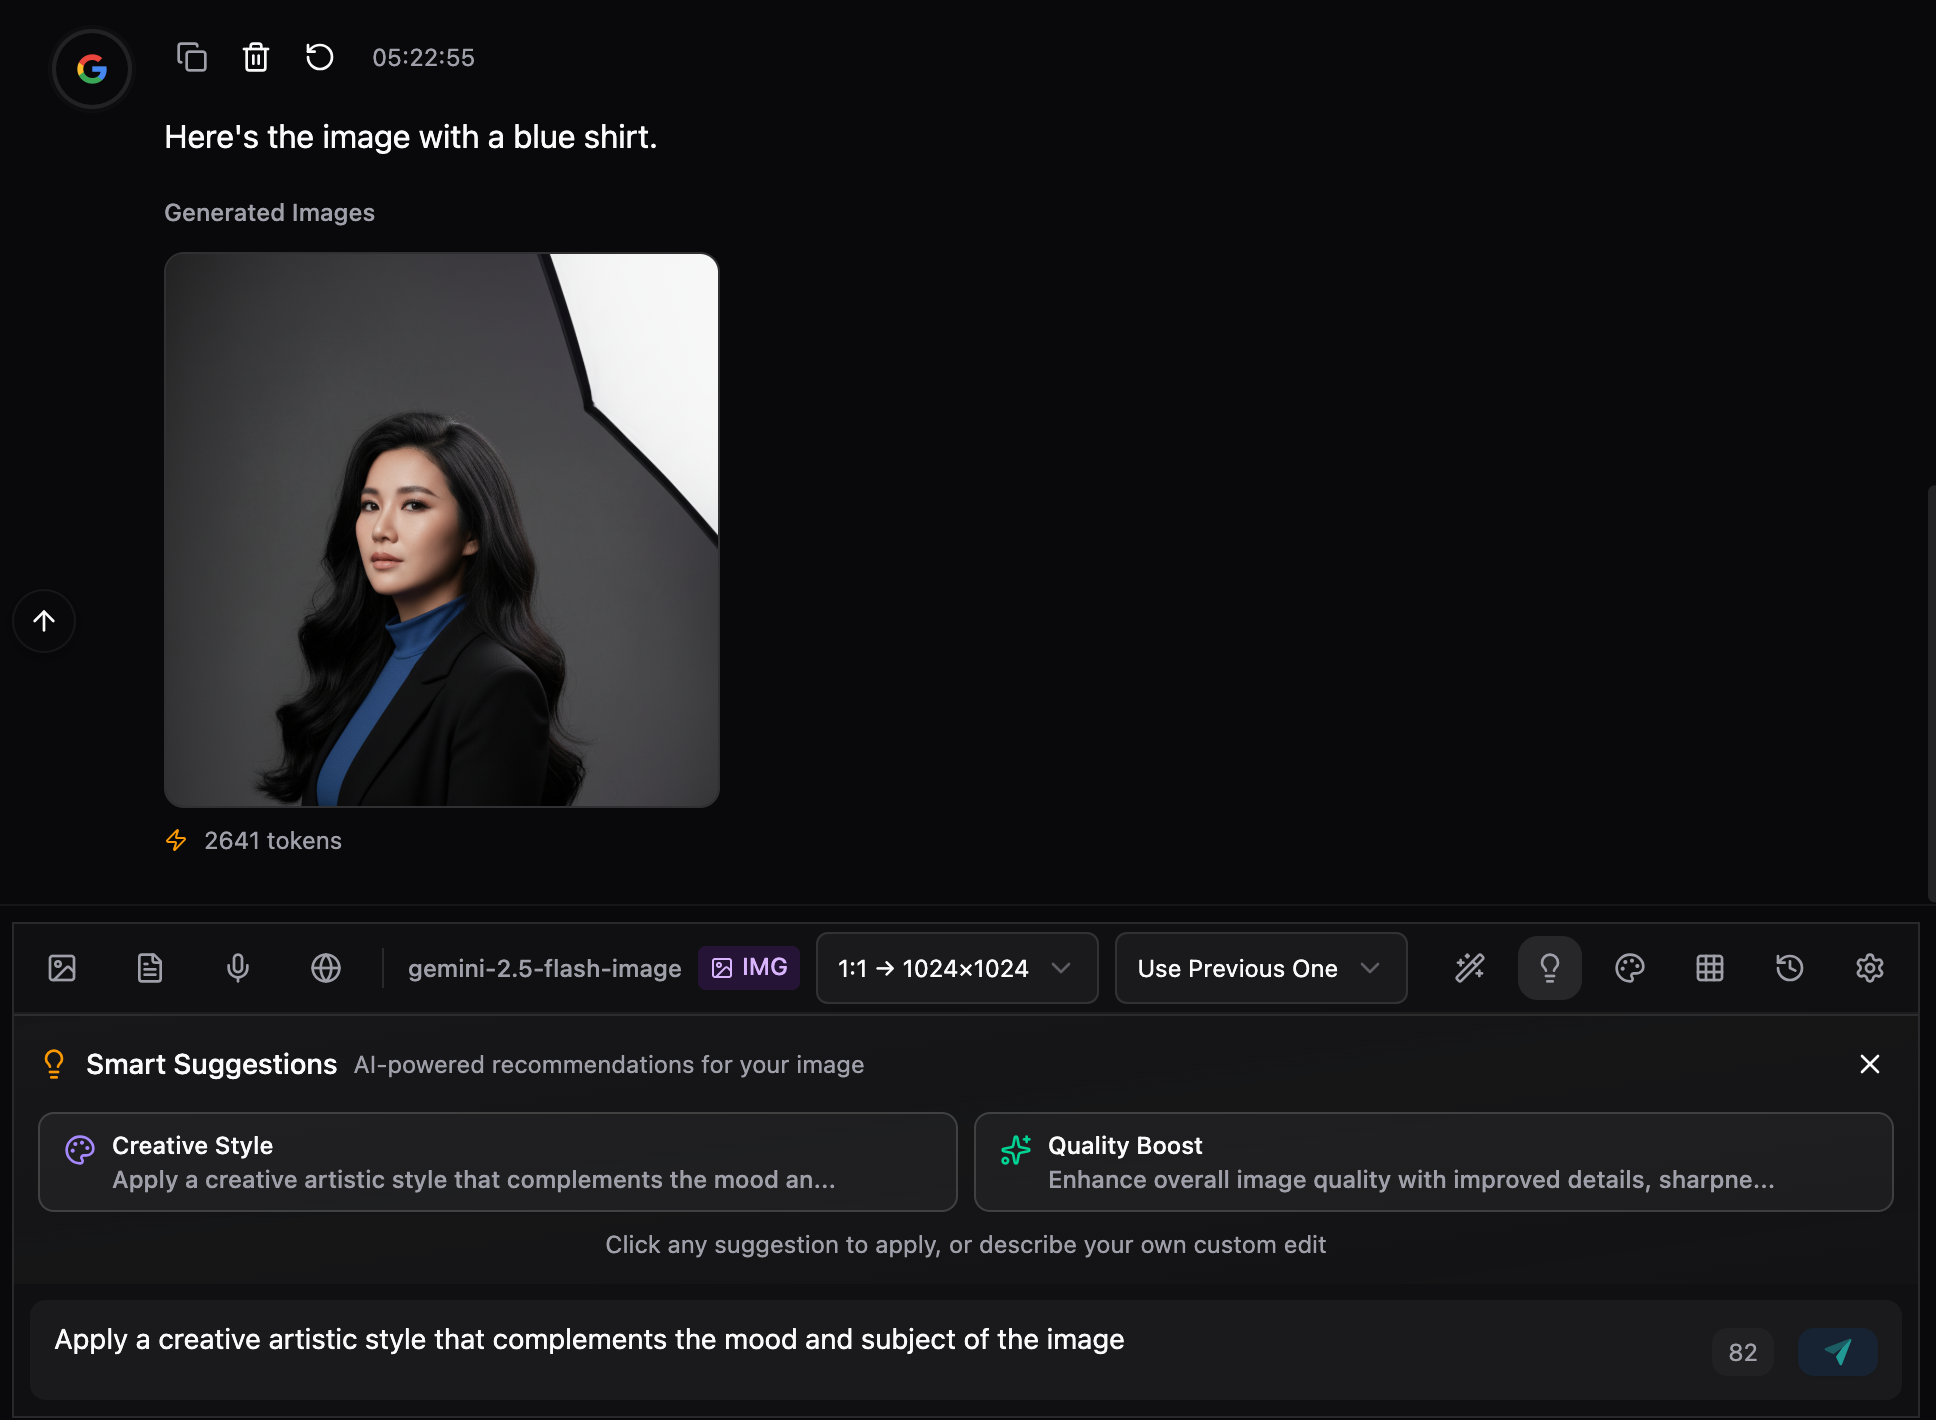
2. Type: "Make the shirt blue instead of silver"
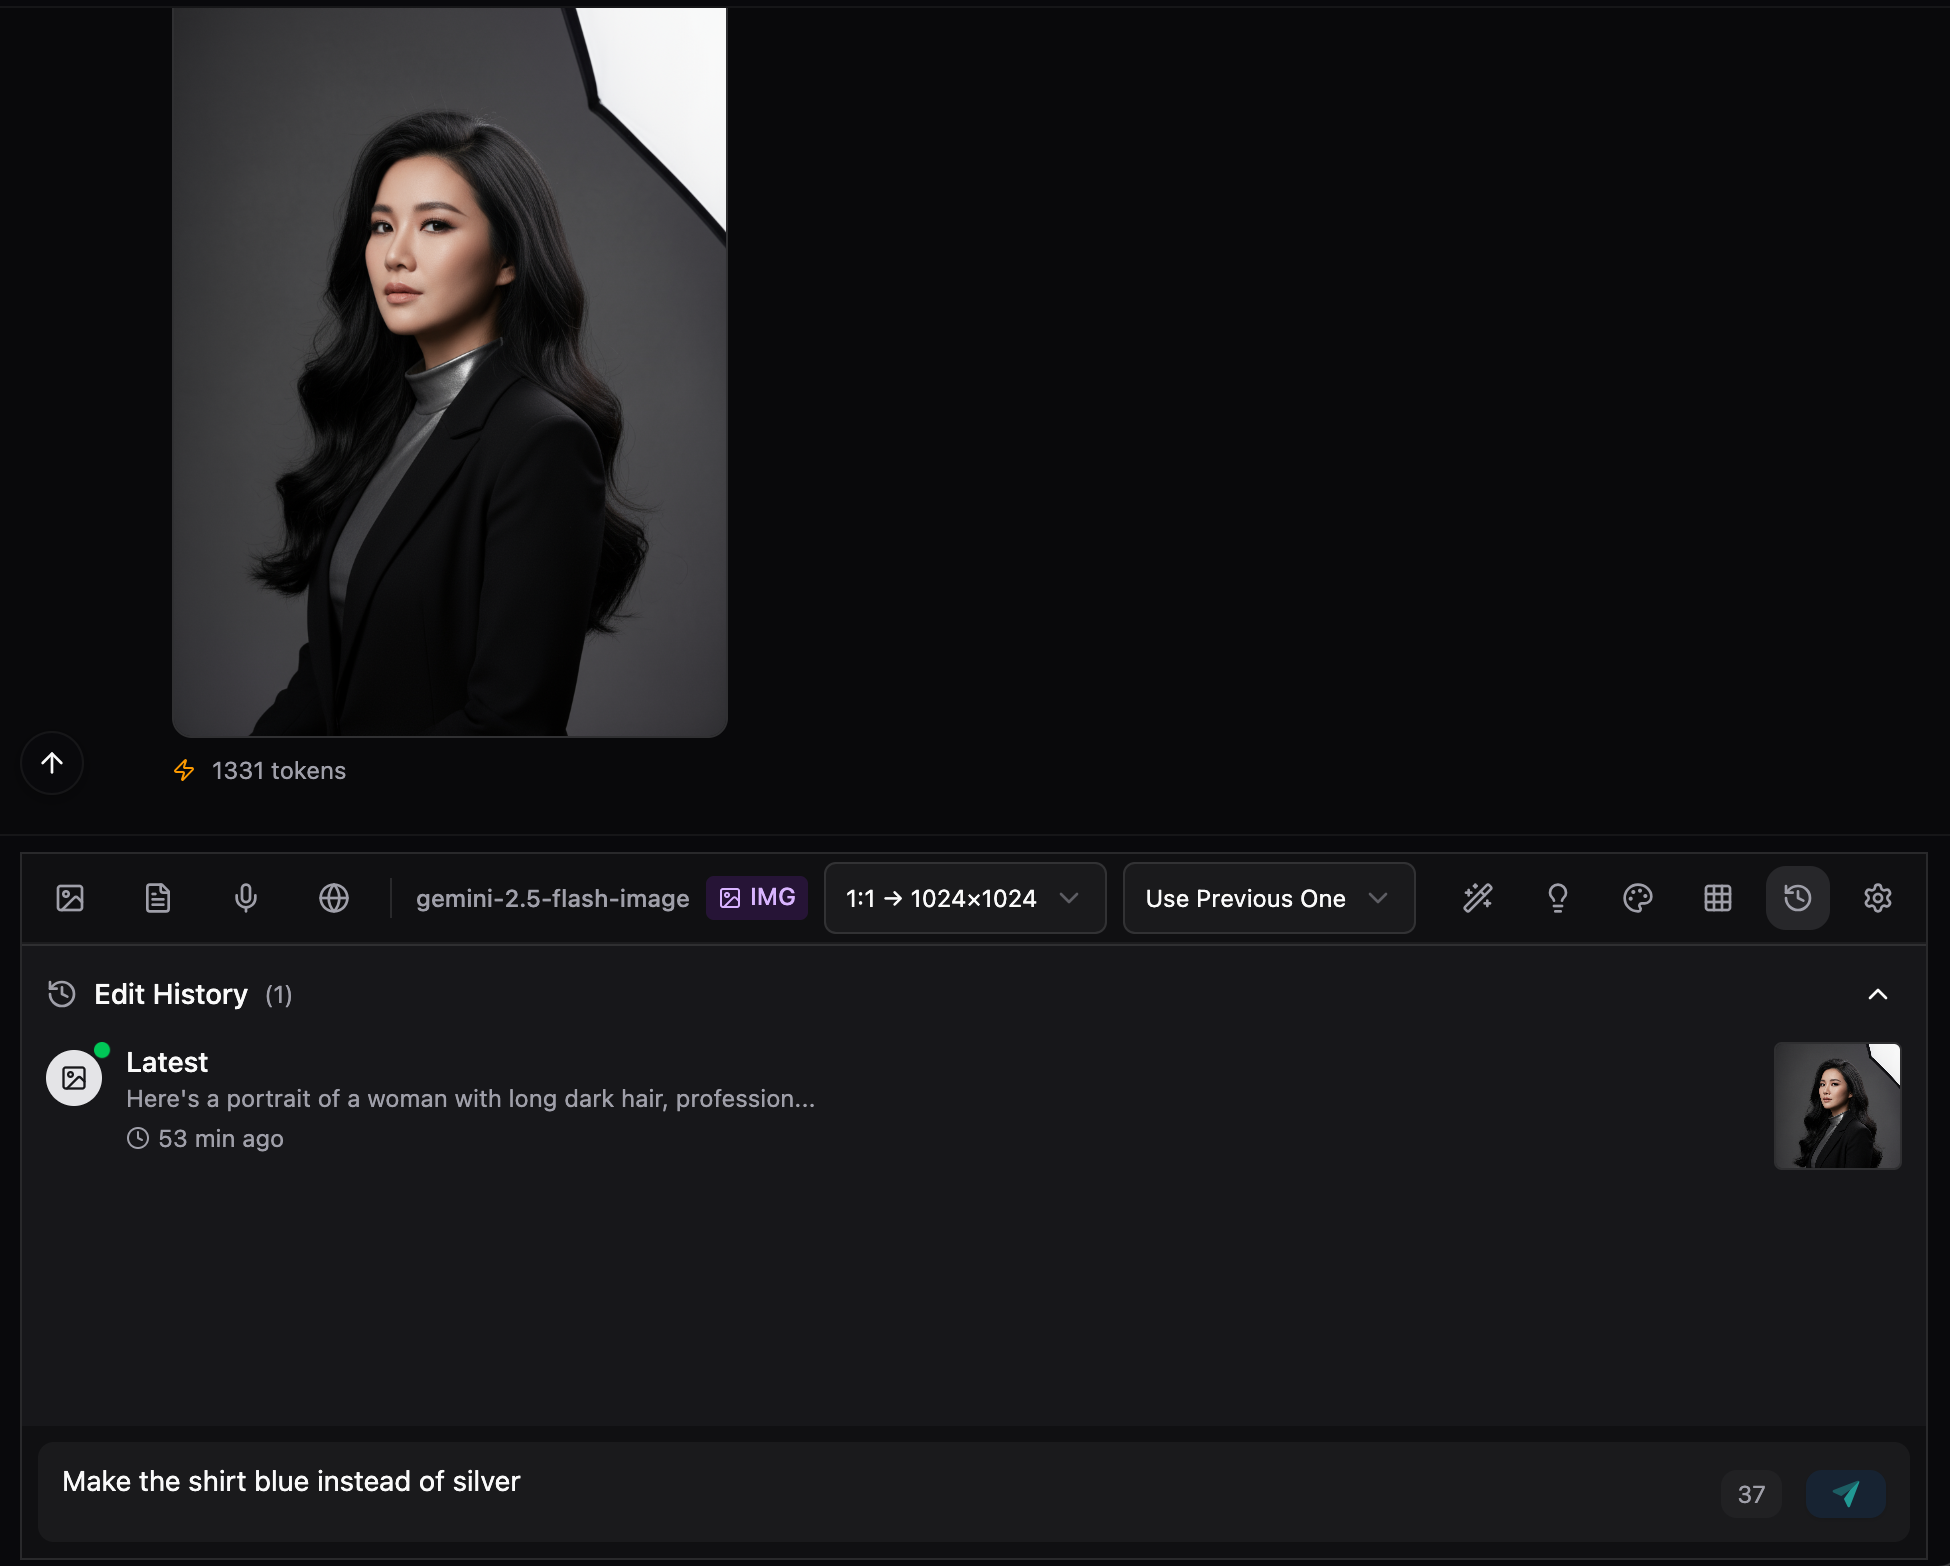 |
|---|
3. AI focuses on the annotated area
 |
|---|
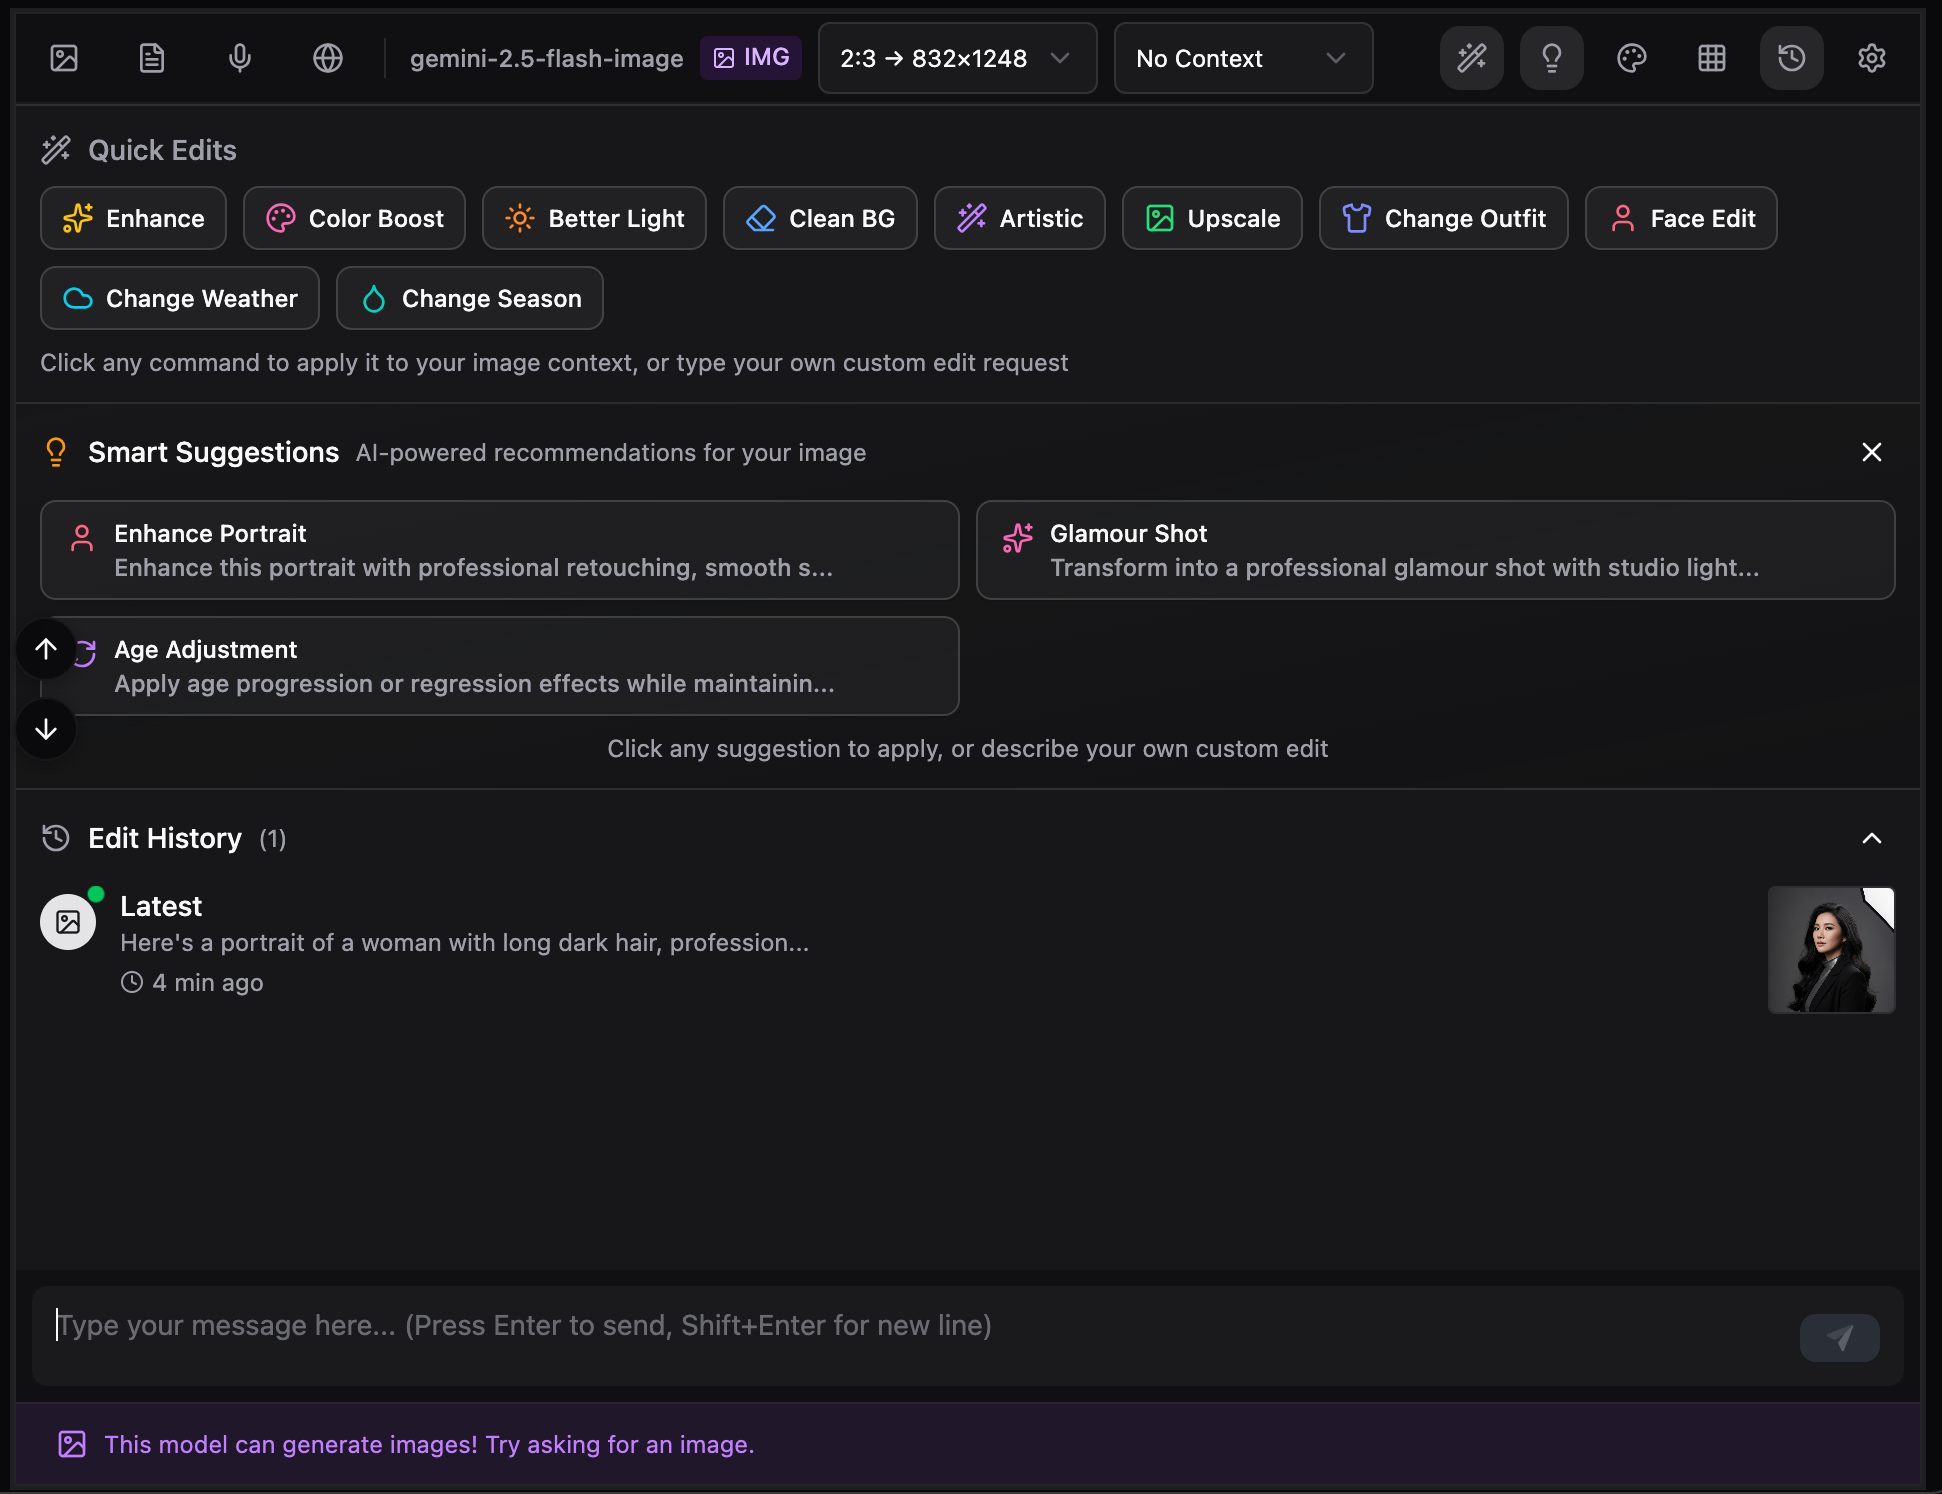
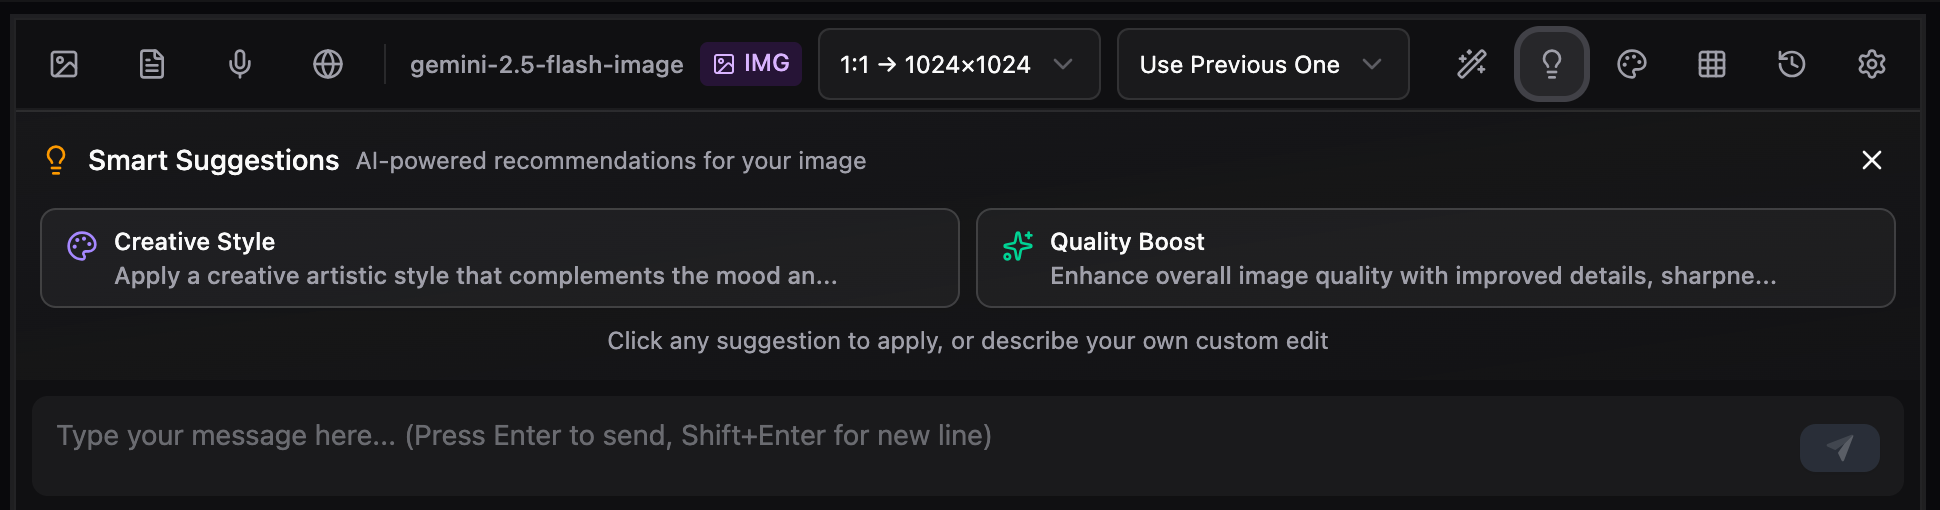
4. Smart AI Suggestions
Context-aware editing recommendations based on image analysis.
 |
|---|
How It Works:
The AI analyzes:
- Image content (people, landscapes, buildings, etc.)
- Your previous prompts
- Common editing patterns
Then suggests 4 most relevant edits.
Suggestion Types:
Portrait Detection:
- Enhance Portrait - Professional retouching
- Glamour Shot - Magazine-quality finish
- Age Adjustment - Age progression/regression
Landscape Detection:
- Dramatic Landscape - Enhanced atmosphere
- Change Time of Day - Golden hour, night, etc.
Architecture Detection:
- Architectural Enhancement - Pro photography effects
- Redesign Interior - New furniture/style
Product Detection:
- Product Photography - Studio-quality commercial
General (Always Available):
- Creative Style - Artistic transformation
- Quality Boost - Enhanced details and sharpness
How to Use:
Suggestions appear automatically when:
- You have a generated image
- Using
google/gemini-2.5-flash-imagemodel
Just click any suggestion to apply!
 |
|---|
 |
|---|
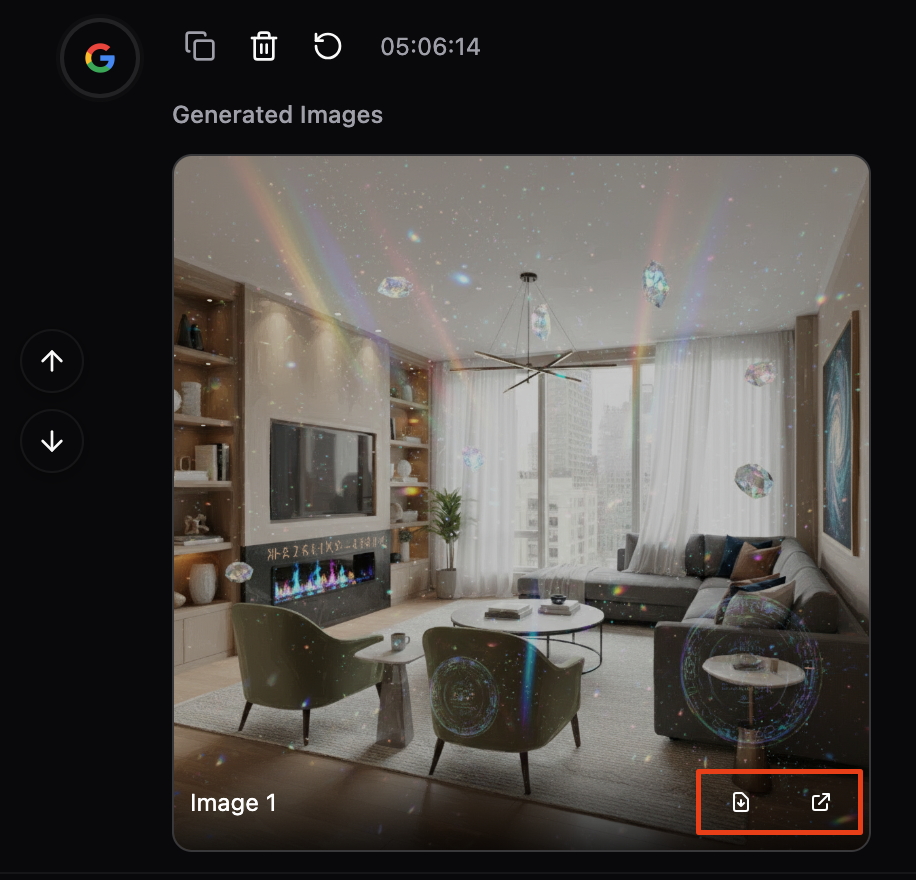
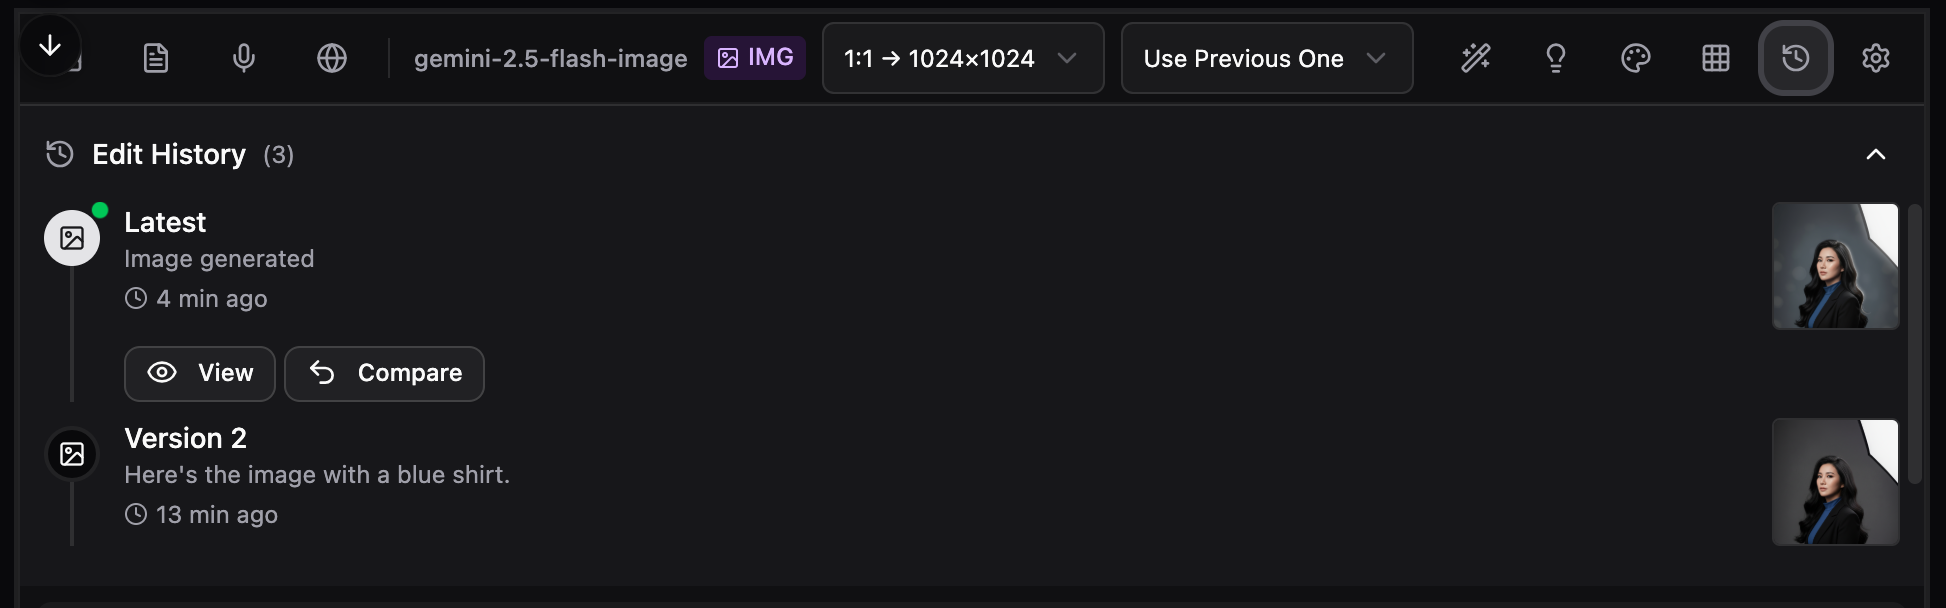
5. Edit History Timeline
Visual timeline of all your image edits with version control.
Features:
- Chronological List - Newest first
- Thumbnail Previews - Quick visual reference
- Smart Timestamps - "Just now", "5 min ago", etc.
- Edit Descriptions - Shows your prompt
- Multi-image Badges - Shows count if multiple
- Latest Indicator - Green pulse on newest
Actions Available:
- View - Open in image viewer
- Compare - Compare with latest version
 |
|---|
How to Use:
Always visible when using google/gemini-2.5-flash-image model.
Collapse/Expand: Click the "Edit History" header
Jump to Version:
- Find the version you want in timeline
- Hover to reveal actions
- Click "View" to see it
- Click "Compare" to see differences
Use Case:
Generated 5 different edits, but version 3 was best?
→ Find it in timeline
→ Click "View" to see it
→ Click "Compare" to see vs current
→ Reference it in your next prompt
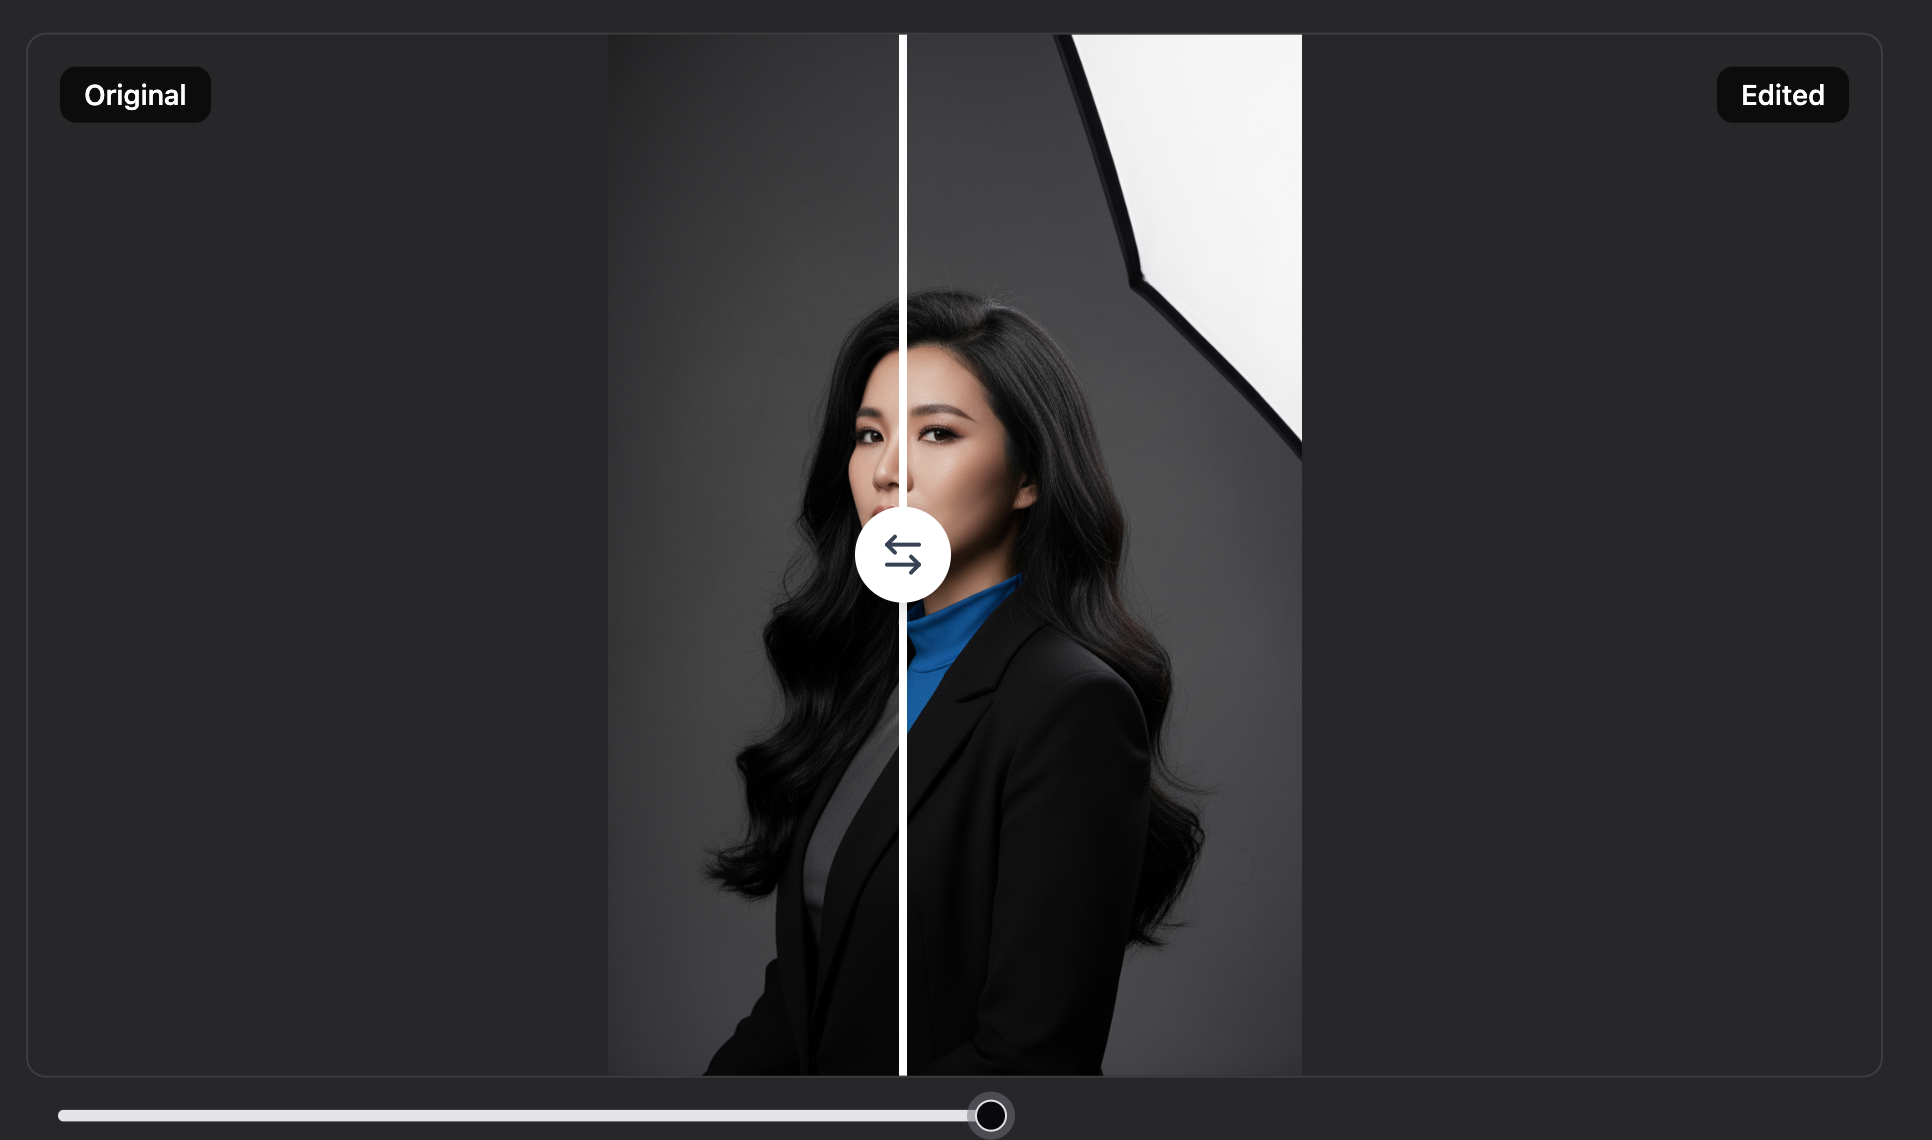
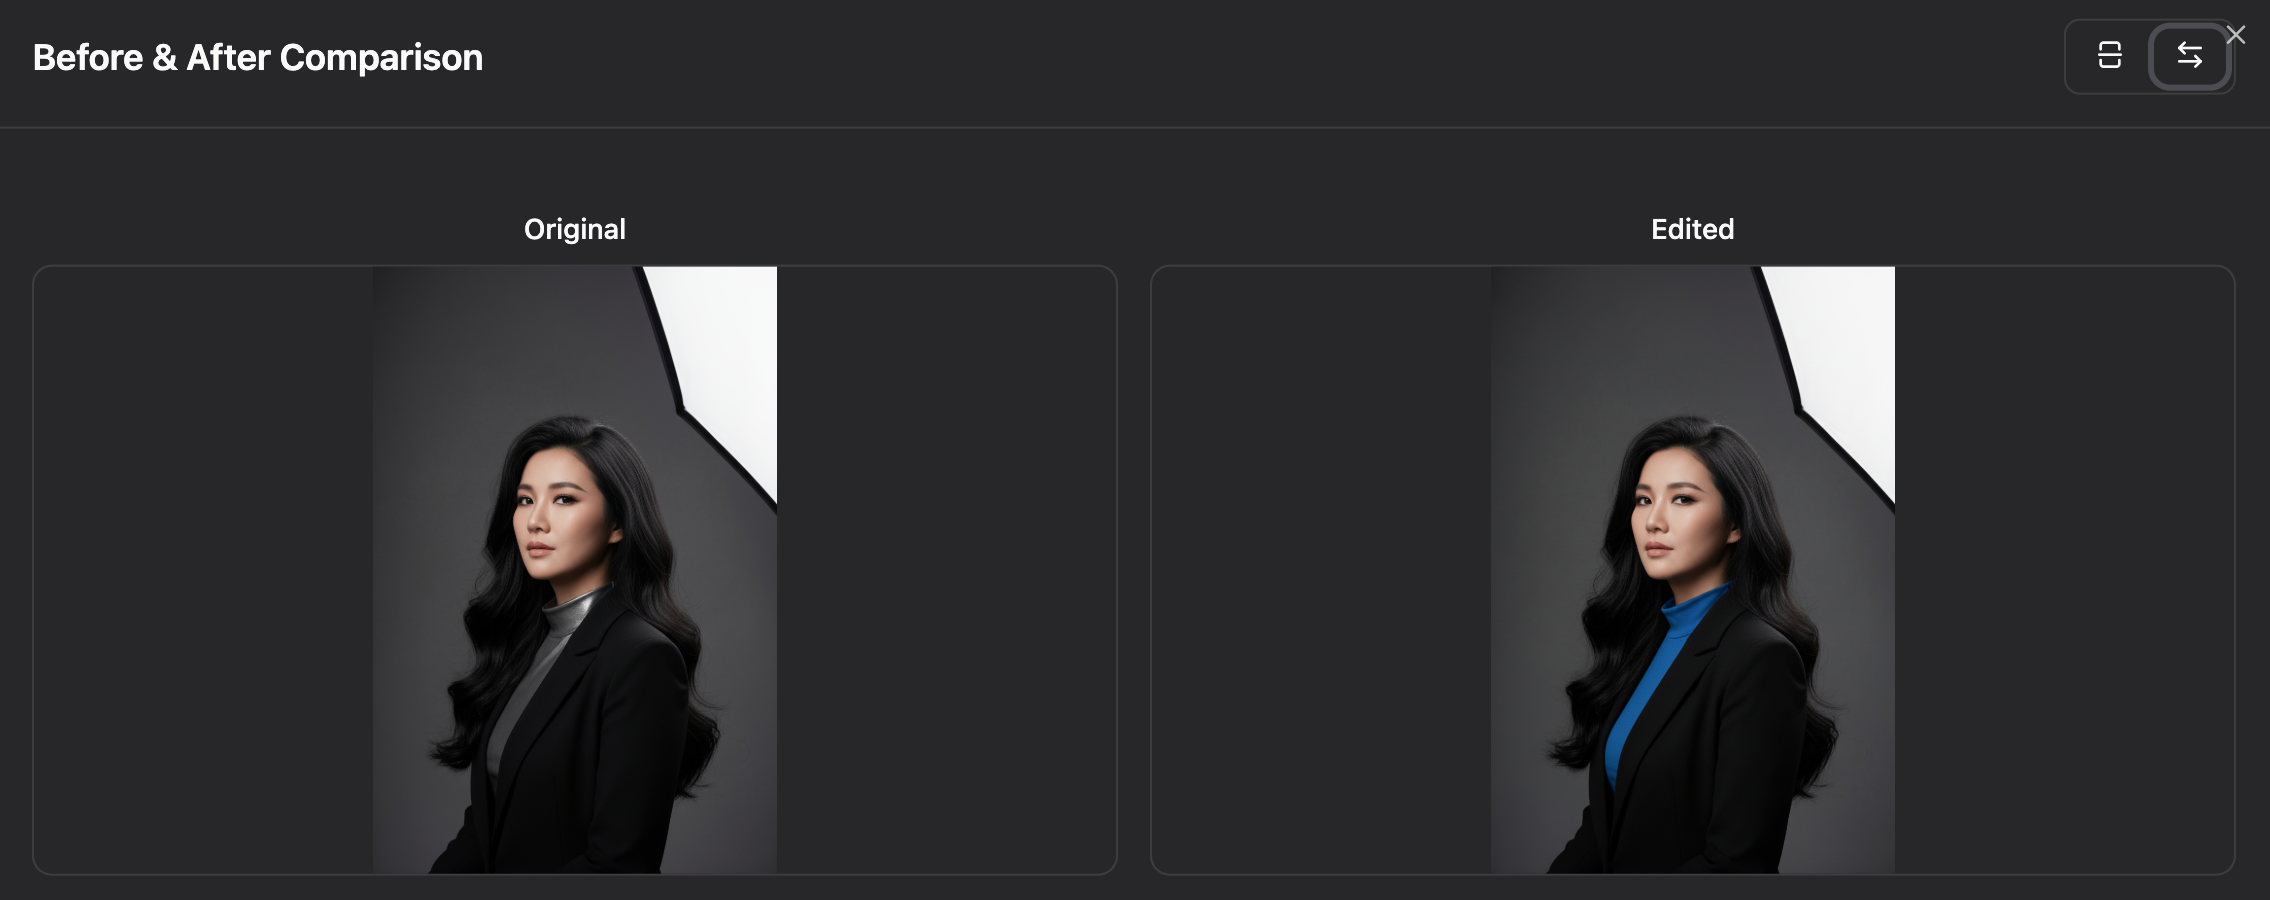
6. Before-After Comparison
Interactive comparison tool with two view modes.
View Modes:
Slider Mode:
- Drag handle left/right to reveal before/after
- Click anywhere to jump
- Precision slider control below
- Real-time percentage display
 |
|---|
Side-by-Side Mode:
- Split screen comparison
- Equal sizing for accuracy
- Labels for clarity
 |
|---|
How to Use:
Access via Edit History:
- Open Edit History Timeline
- Hover over any previous version
- Click "Compare" button
- Interactive comparison opens
Toggle Views:
- Click icon for Slider Mode
- Click icon for Side-by-Side
Perfect For:
- Seeing subtle changes
- Validating improvements
- Choosing between versions
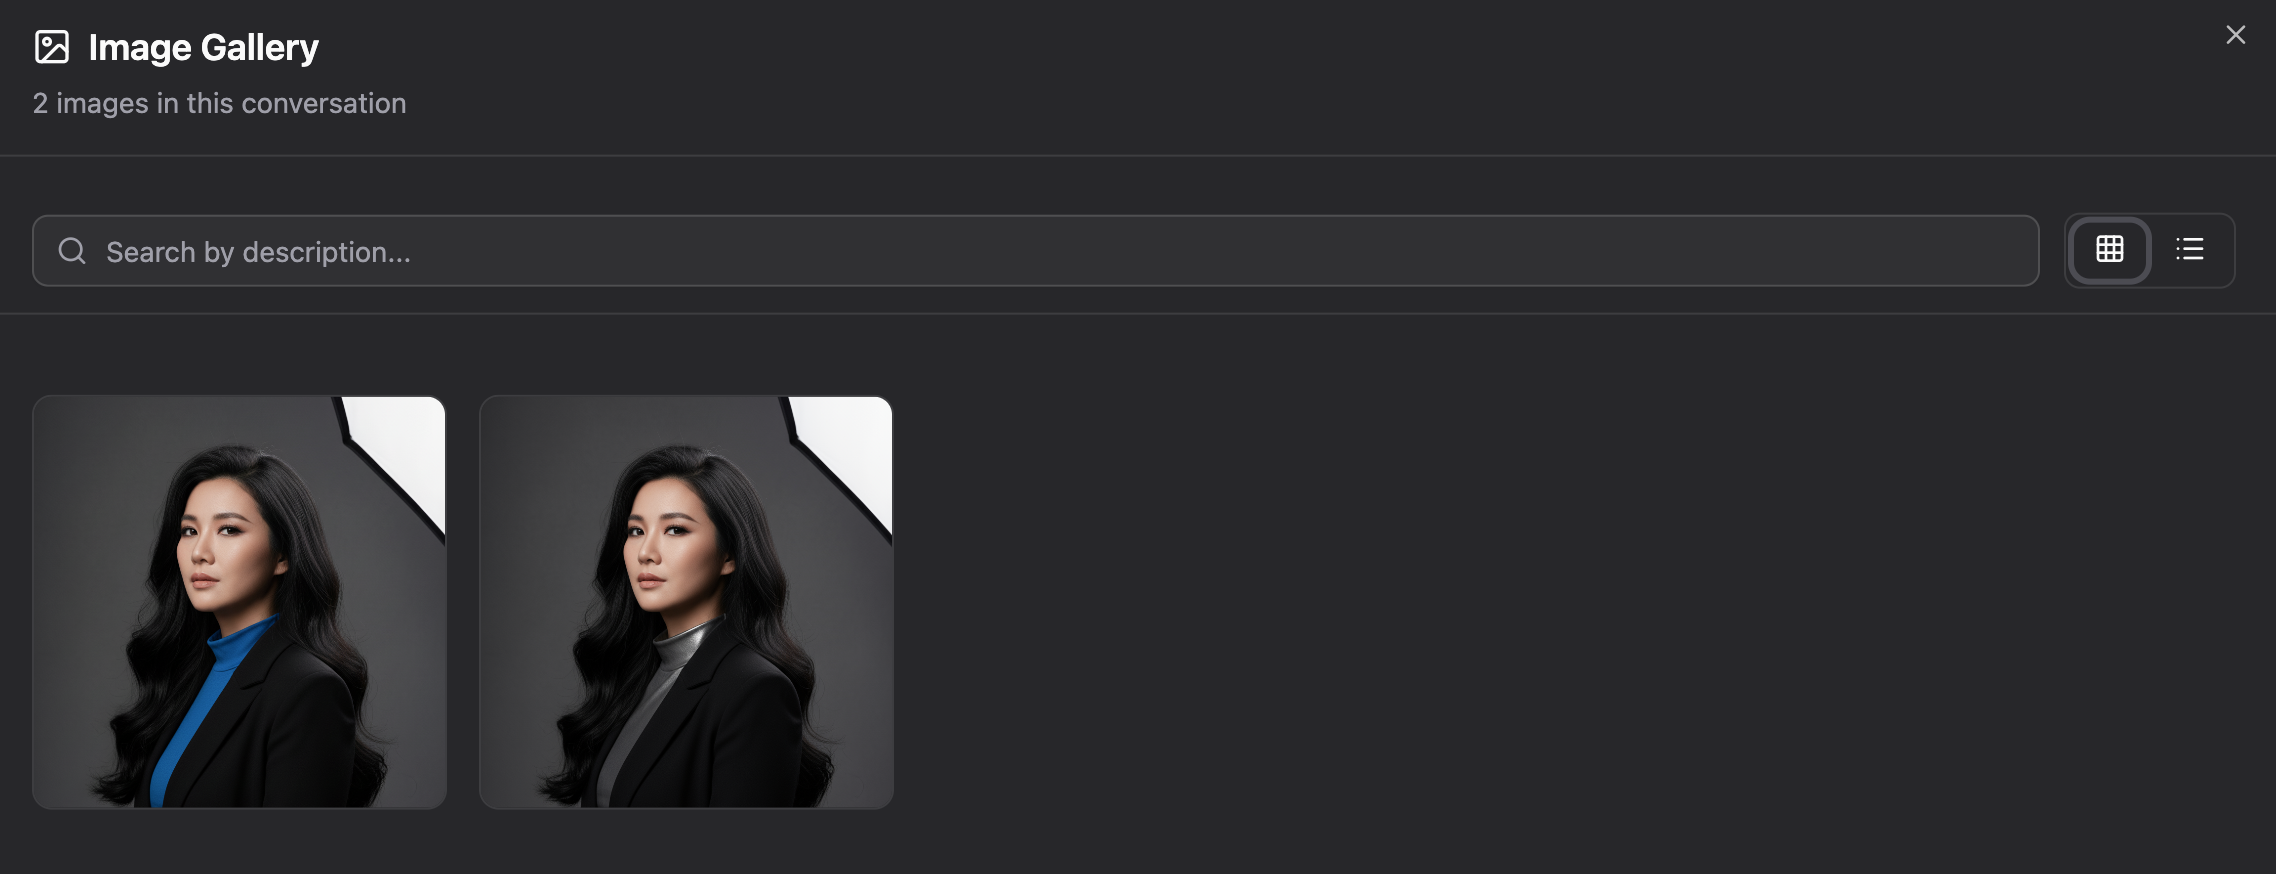
7. Image Gallery
Complete image library for the current conversation.
 |
|---|
Features:
Two View Modes:
- Grid View - Beautiful visual grid
- List View - Detailed with metadata
Search & Filter:
- Search by description/context
- Real-time filtering
- Find images quickly
Management:
- Favorite images (star icon)
- Download individually
- View in full viewer
- Timestamps for organization
Information:
- Total image count
- Creation timestamps
- Context/description
How to Use:
Open Gallery:
- Click Grid icon in toolbar
- Or press
Gkeyboard shortcut
Search:
Type: "portrait" → Shows only portraits
Type: "landscape" → Shows only landscapes
Actions:
- Click image → Opens in viewer
- Hover → Shows quick actions
- Star → Marks as favorite
- Download → Saves locally
Use Cases:
- Find that great edit from 10 minutes ago
- Download all favorites at once
- Review your editing session
- Compare multiple versions visually
8. Multi-turn Image Context
Use previous images as context for seamless editing workflows.
 |
|---|
Context Modes:
| Mode | Description | Use When |
|---|---|---|
| No Context | Fresh generation | Starting new image |
| Use Previous One | Last image as context | Continuing single edit |
| Use Previous Ten | Last 10 images as context | Complex multi-image edits |
How It Works:
When you enable context:
- AI receives previous image(s) automatically
- Your edit applies to those images
- Creates edited version maintaining consistency
How to Use:
Enable Context:
- Look for "Image Context" selector (next to Aspect Ratio)
- Choose your mode
- Type your edit
- AI applies to context images
Example Workflow:
Turn 1: "Portrait of a man in a suit"
→ Context: No Context
Note: Select Aspect Ratio 2:3 -> 832x1248 for best practice
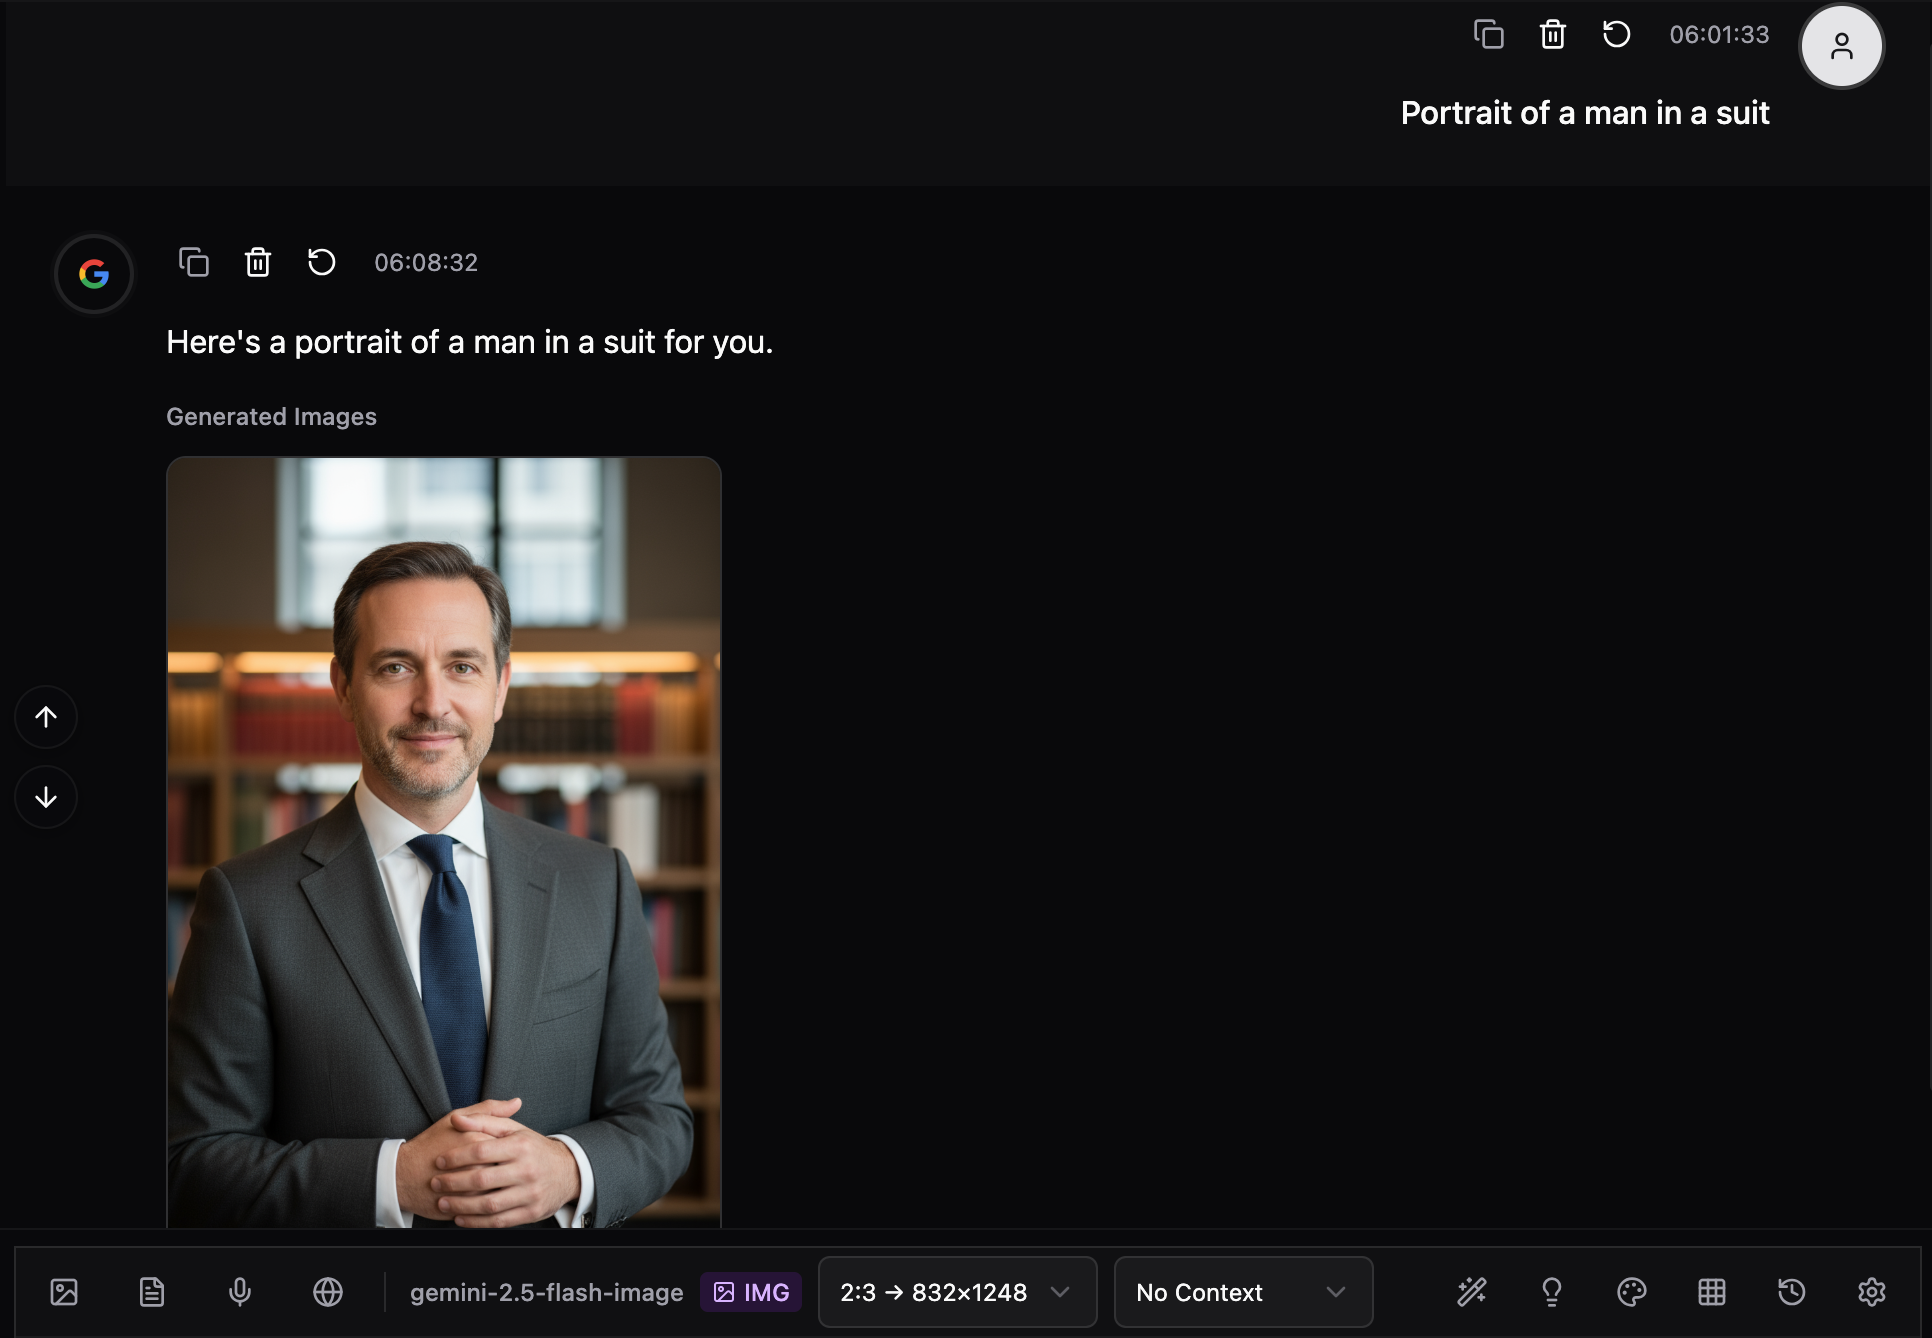 |
|---|
Turn 2: "Make the suit blue"
→ Context: Use Previous One
→ AI edits the existing portrait
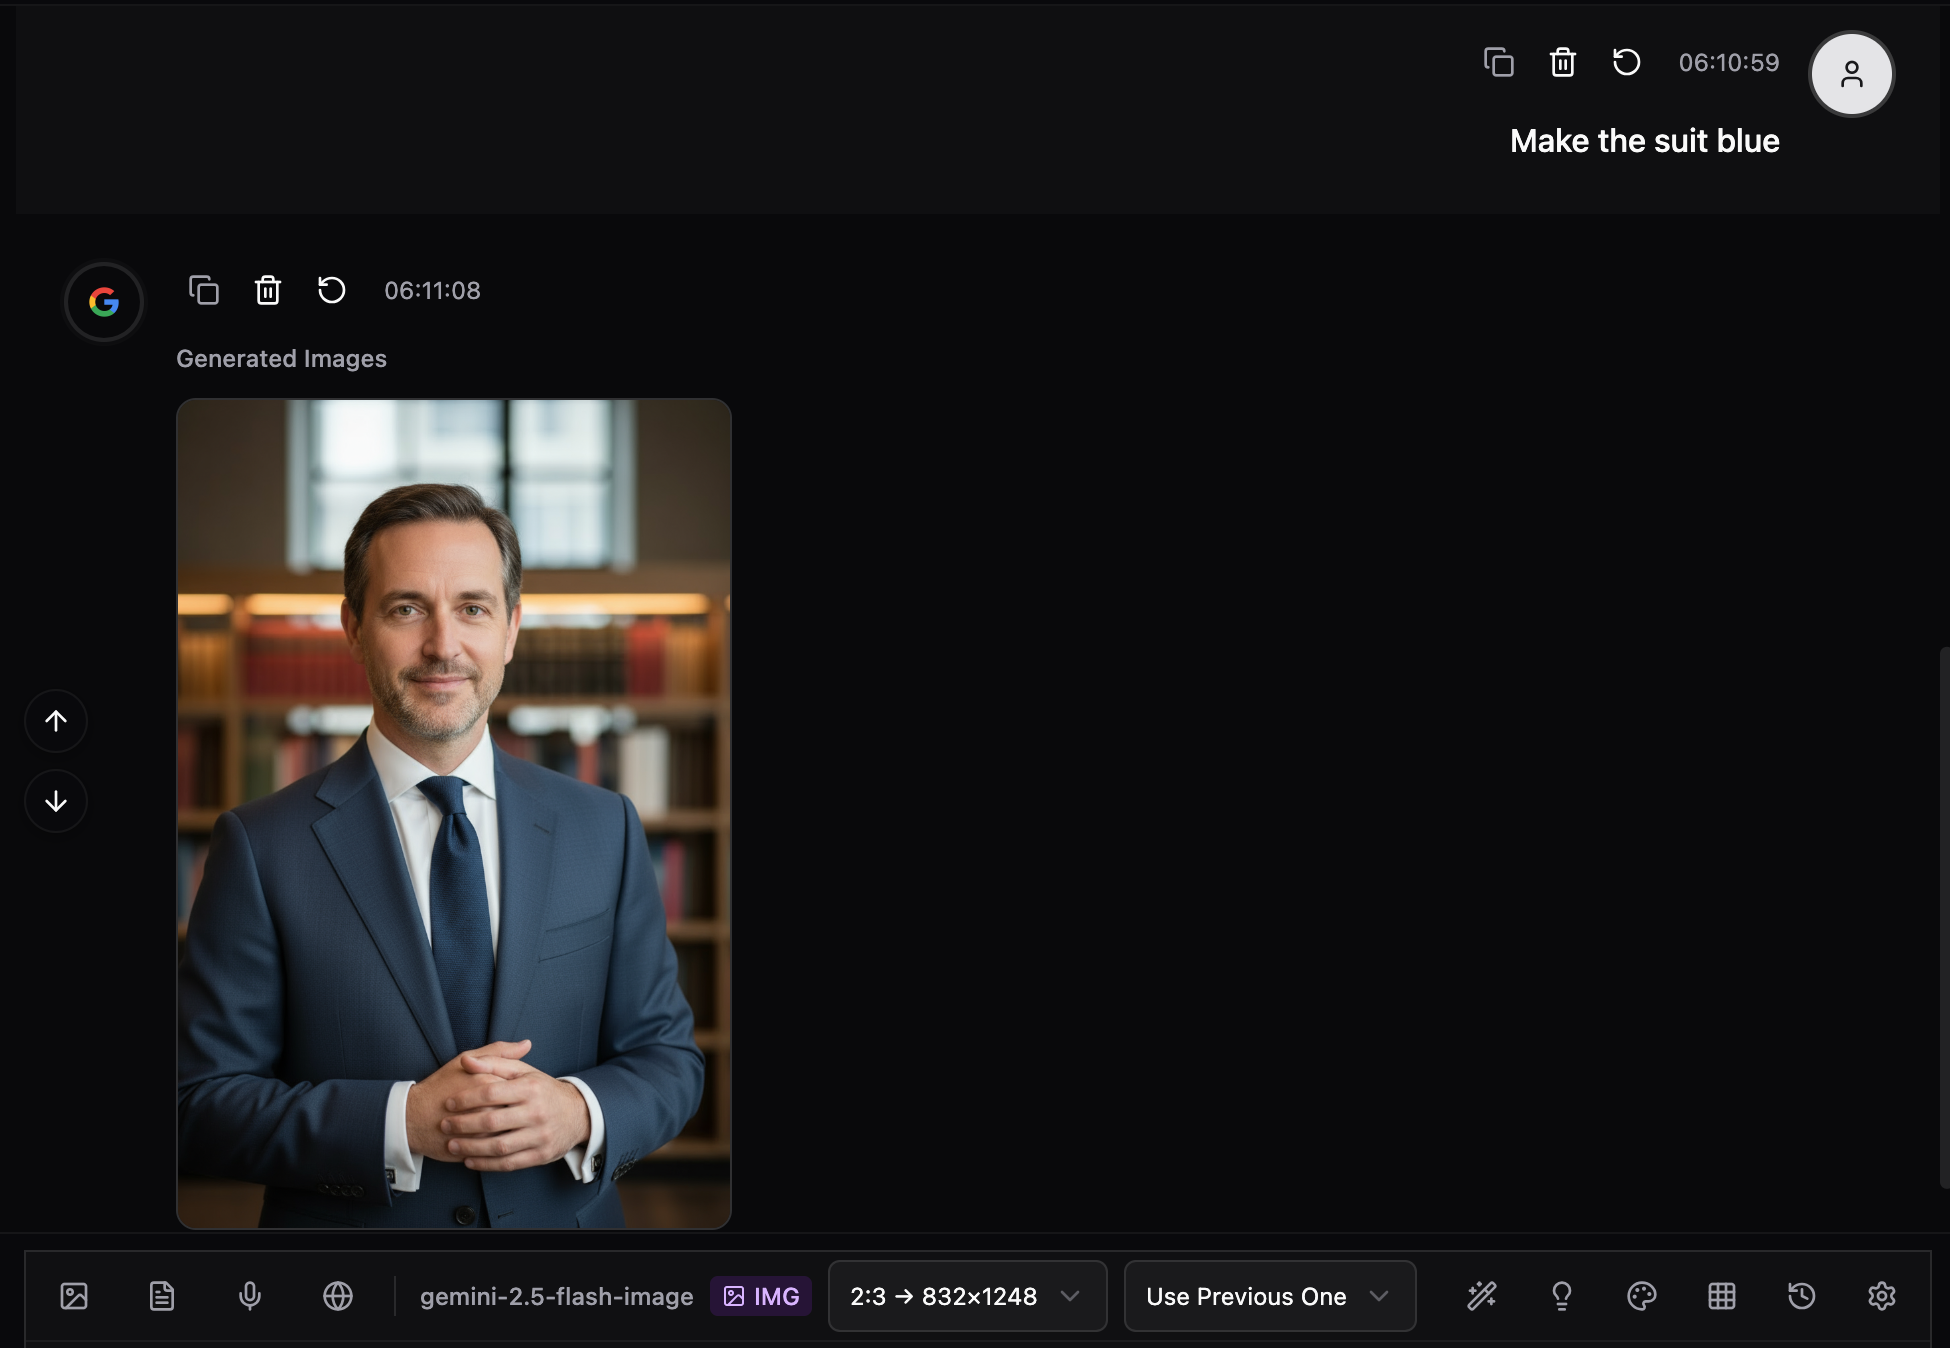 |
|---|
Turn 3: "Add a hat"
→ Context: Use Previous One
→ AI adds hat to the blue suit version
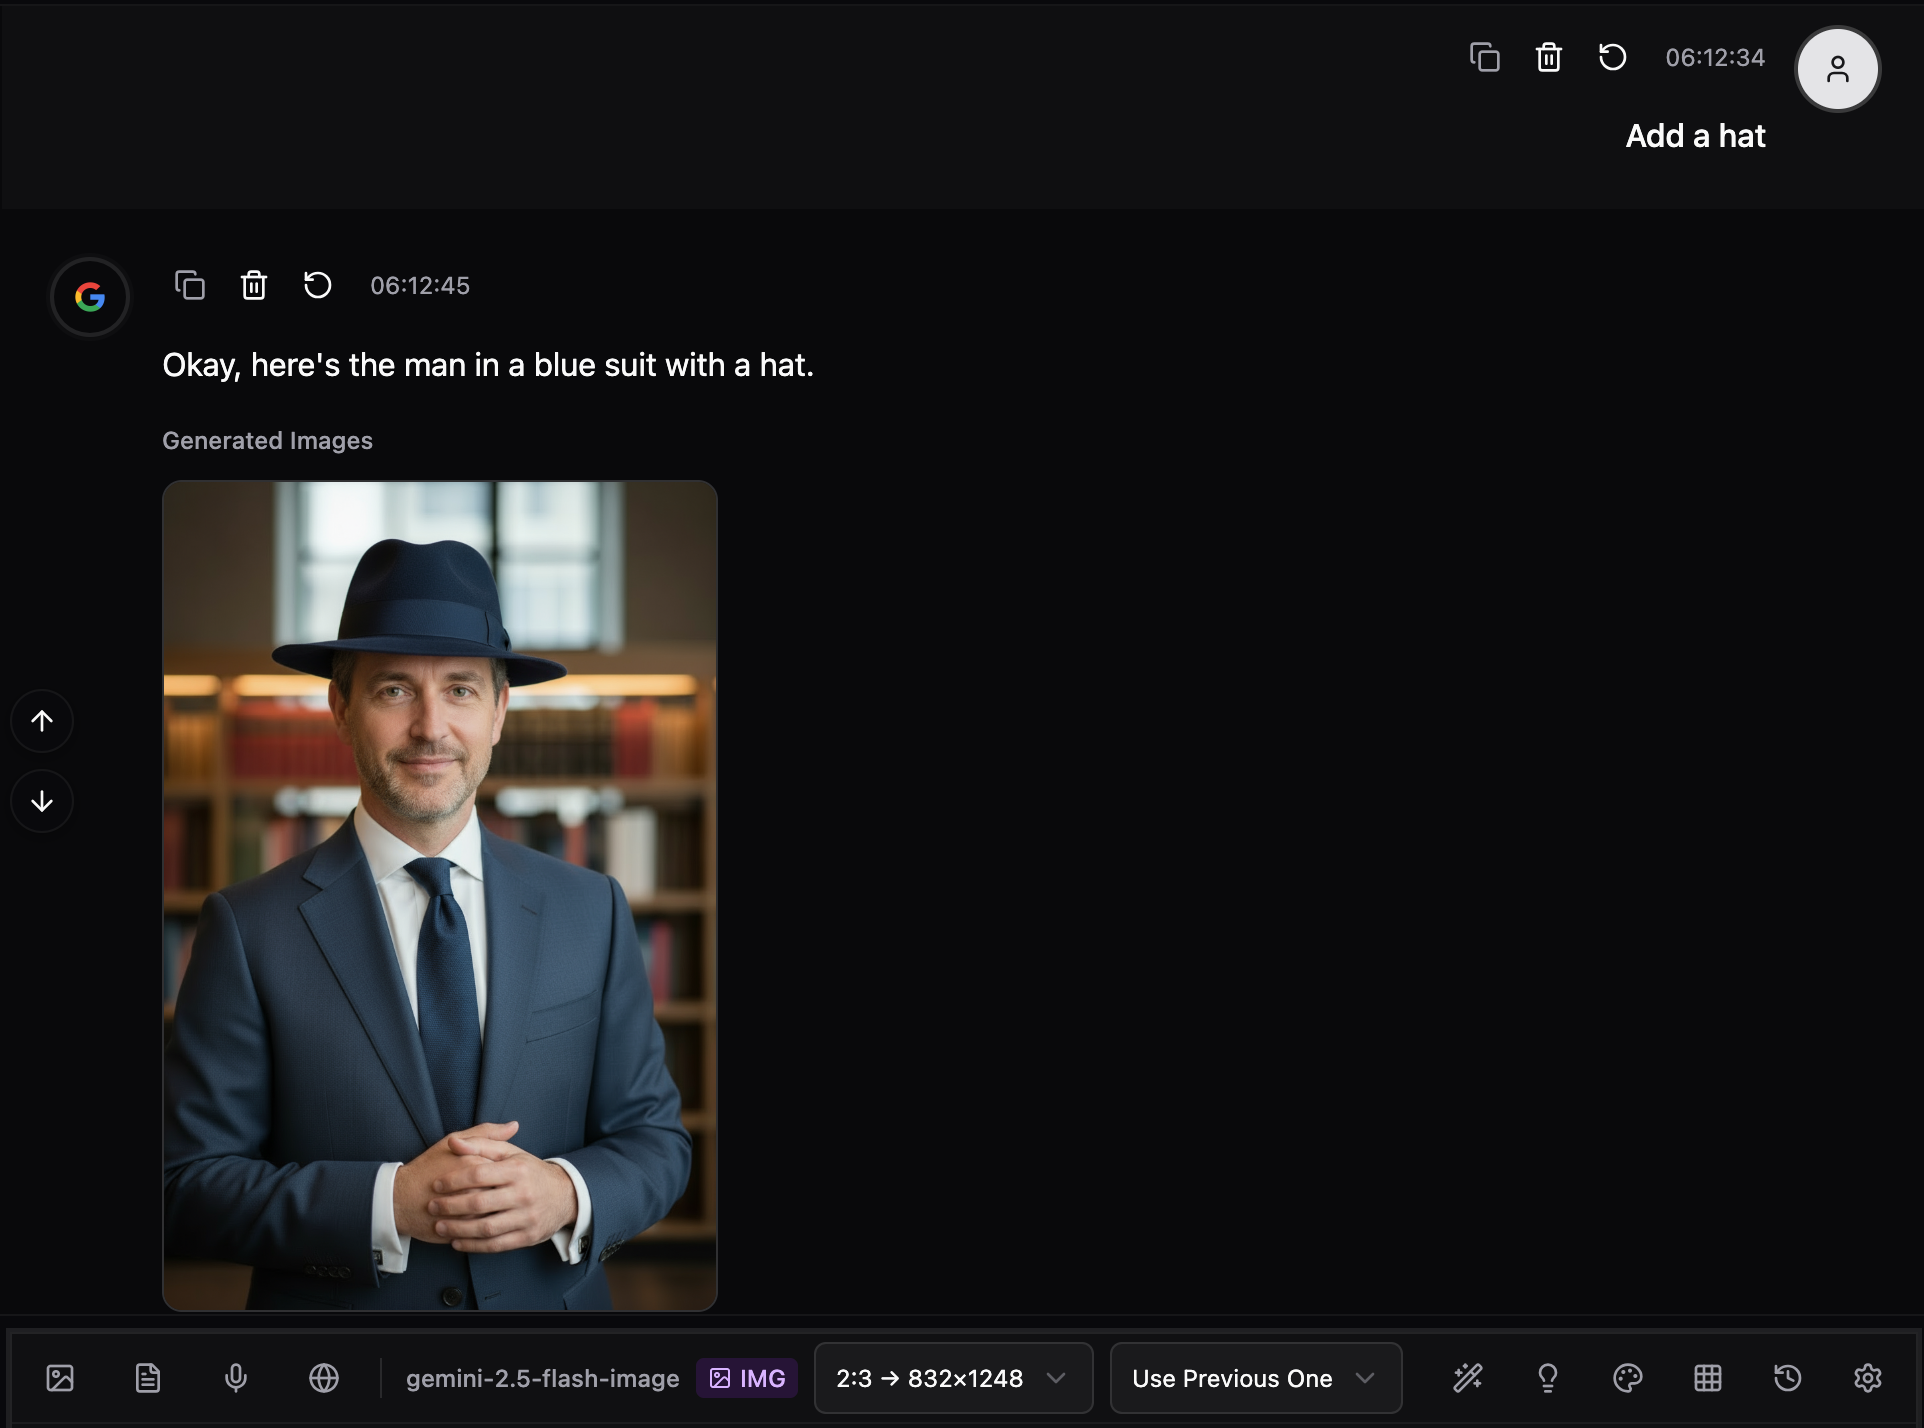 |
|---|
Turn 4: "Create 3 variations"
→ Context: Use Previous One
→ AI creates 3 variations maintaining style
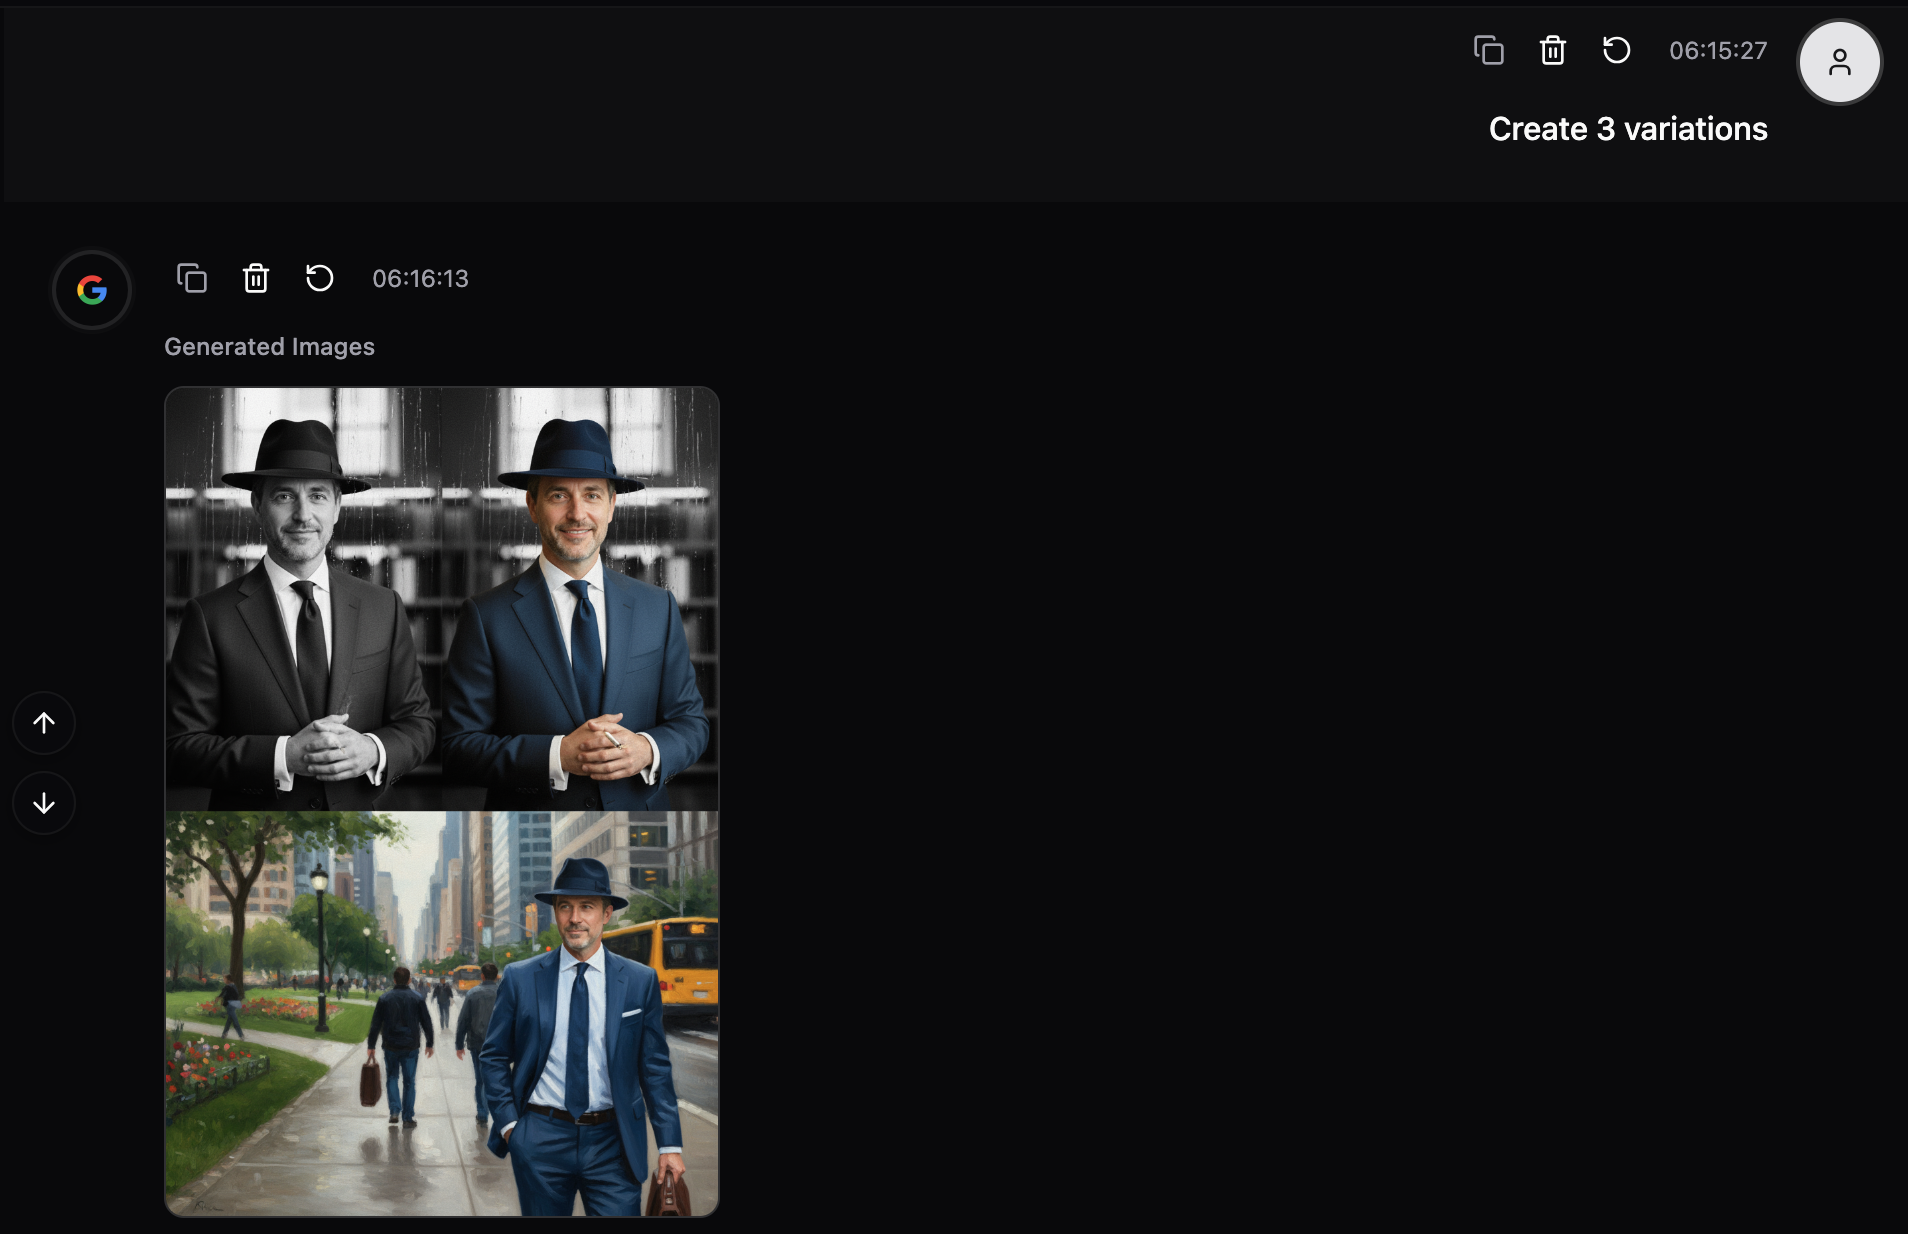 |
|---|
Advanced Use:
"Use Previous Ten" Mode:
- For batch processing
- Maintaining consistent style across series
- Complex multi-step edits
Pro Tip: Context includes both:
- AI-generated images
- User-uploaded images
- But NOT user text prompts (clean slate each time!)
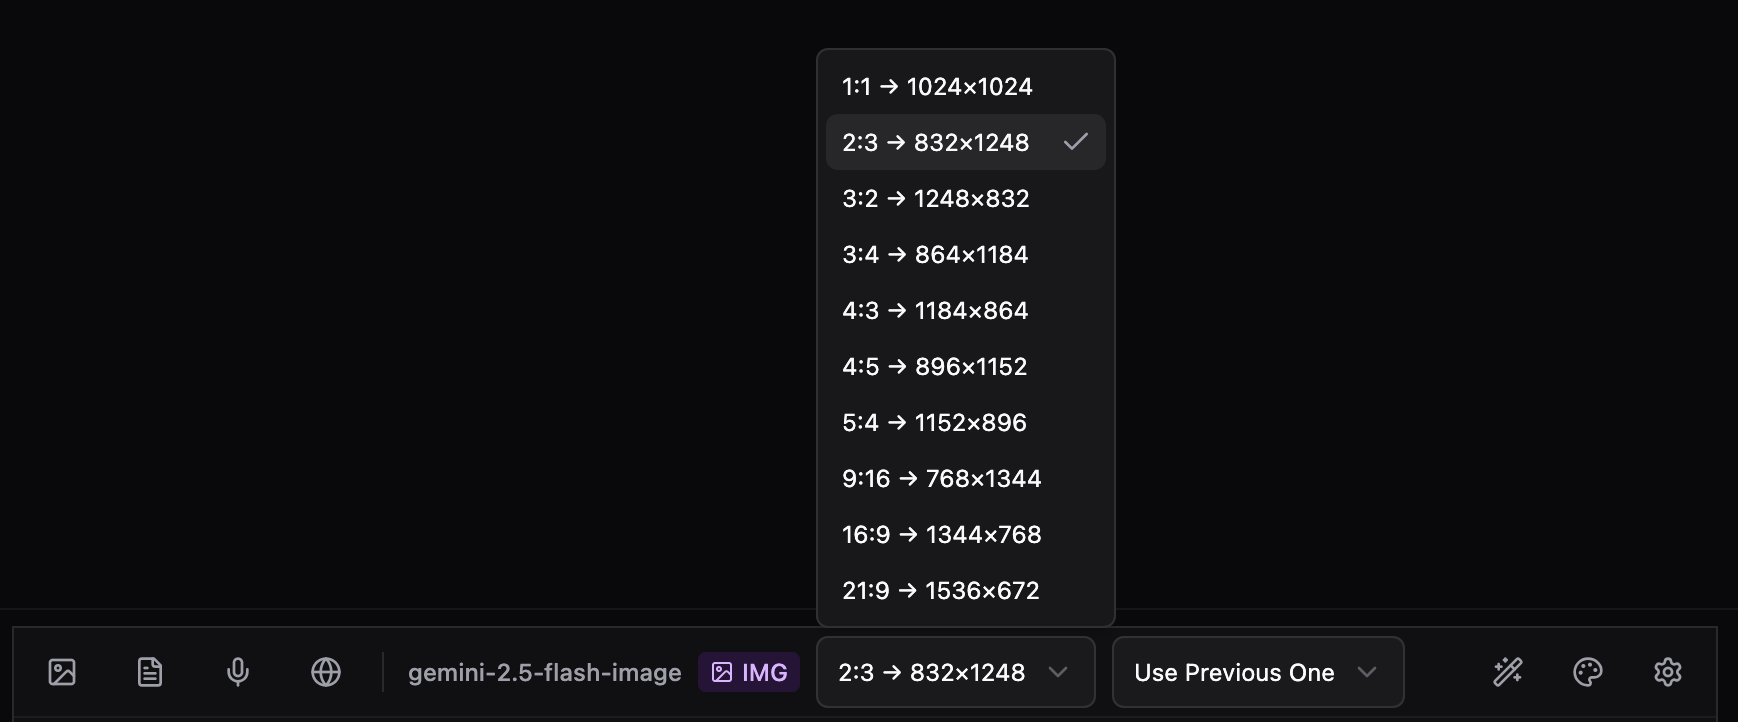
9. Aspect Ratio Control
 |
|---|
10 aspect ratios optimized for different use cases.
Available Ratios:
| Ratio | Dimensions | Best For |
|---|---|---|
| 1:1 | 1024×1024 | Social media, avatars |
| 2:3 | 832×1248 | Portraits, prints |
| 3:2 | 1248×832 | Photography standard |
| 3:4 | 864×1184 | Portraits, posters |
| 4:3 | 1184×864 | Presentations, screens |
| 4:5 | 896×1152 | Instagram posts |
| 5:4 | 1152×896 | Classic prints |
| 9:16 | 768×1344 | Stories, vertical video |
| 16:9 | 1344×768 | Widescreen, YouTube |
| 21:9 | 1536×672 | Cinematic, ultrawide |
How to Use:
- Look for Aspect Ratio selector in toolbar
- Select desired ratio before generation
- Generate image
- Image will be created in selected ratio
Note: Only available for google/gemini-2.5-flash-image model
10. Keyboard Shortcuts
Lightning-fast workflow for power users.
Navigation Shortcuts:
| Shortcut | Action |
|---|---|
Cmd/Ctrl + K | Focus input field |
Cmd/Ctrl + G | Open image gallery |
Cmd/Ctrl + H | Open edit history |
Cmd/Ctrl + , | Open settings |
Editing Shortcuts:
| Shortcut | Action |
|---|---|
Q | Toggle quick edits panel |
S | Open style gallery |
Cmd/Ctrl + S | Open style gallery (anytime) |
Quick Access:
| Shortcut | Action |
|---|---|
G | Open gallery |
H | Toggle history |
/ | Focus search |
? | Show shortcuts help |
Smart Behavior:
- ✅ Works globally (except when typing)
- ✅ Cmd/Ctrl shortcuts work anytime
- ✅ Disabled when modals open
- ✅ Non-intrusive design
Pro Tip: Memorize Cmd+K (focus) and S (styles) for fastest workflow!
Complete Workflows
Workflow 1: Quick Enhancement
Goal: Improve an existing photo
1. Generate or upload base image
2. Press 'Q' → Select "Enhance"
3. Press Enter
4. Press 'S' → Choose "HDR" style
5. Press Enter
6. Done! Two clicks, professional result
Workflow 2: Portrait Makeover
Goal: Transform a portrait completely
1. Generate: "Portrait of a person"
2. Smart Suggestions → "Enhance Portrait"
3. Quick Edit → "Better Light"
4. Style Gallery → "Cinematic"
5. Custom: "Add dramatic shadows"
6. Edit History → Compare with original
7. Download favorite version
Workflow 3: Style Exploration
Goal: Try multiple styles on one image
1. Generate base image
2. Context → "Use Previous One"
3. Style Gallery → Try "Oil Painting"
4. Context still on → Try "Watercolor"
5. Context still on → Try "Anime"
6. Gallery → View all versions
7. Star favorites
8. Download collection
Workflow 4: Precise Regional Edit
Goal: Edit specific part of image
1. Click image to open viewer
2. Select ✏️ Draw tool
3. Circle the area to edit
4. Close viewer
5. Type: "Make this area [your edit]"
6. AI focuses on marked region
7. Compare before/after
Workflow 5: Iterative Refinement
Goal: Perfect an image through multiple edits
1. Generate starting image
2. Context → "Use Previous One" (keep ON)
3. Edit 1: "Make colors more vibrant"
4. Edit 2: "Add more contrast"
5. Edit 3: "Soften the lighting"
6. Edit History → Review all versions
7. Compare version 2 vs version 4
8. Download best version
Pro Tips & Best Practices
Tips for Best Results:
1. Be Specific
❌ "Make it better"
✅ "Enhance colors, improve sharpness, and add dramatic lighting"
2. Use Context Wisely
✅ Single edits → "Use Previous One"
✅ Series/batch → "Use Previous Ten"
❌ New concept → "No Context"
3. Combine Tools
Quick Edit → Smart Suggestion → Custom Prompt = Best Results
4. Track Your Work
- Star favorite versions in Gallery
- Use History to reference good edits
- Compare before making big changes
5. Keyboard Shortcuts
Learn: Cmd+K, S, G, H
Saves hours for frequent users
6. Experiment with Styles
Try 3-4 different styles
Gallery lets you review all
Pick the best afterwards
7. Use Annotations
For precise edits (faces, objects, regions)
Much better than describing location
Comparison: Knox vs Traditional Editors
| Feature | Knox AI Editor | Photoshop | Canva | Pixelmator |
|---|---|---|---|---|
| Learning Curve | None (natural language) | Months | Days | Weeks |
| Speed | Instant | Minutes | Moderate | Moderate |
| AI-Powered | ✅ Full | Limited | Basic | Limited |
| Style Presets | 30+ one-click | Manual | Templates | Manual |
| Edit History | ✅ Visual timeline | ✅ Steps | Limited | ✅ Steps |
| Smart Suggestions | ✅ Context-aware | ❌ | ❌ | ❌ |
| Multi-turn Editing | ✅ Conversation | ❌ | ❌ | ❌ |
| Web-Based | ✅ | ❌ | ✅ | ❌ |
| Price | Free/Usage-based | $$$$ | $$ | $$$ |
| Setup Time | 0 seconds | Hours | Minutes | Hours |
🚀 Advanced Techniques
Technique 1: Batch Style Application
Apply same style to multiple images:
1. Generate 5 different portraits
2. Context → "Use Previous Ten"
3. Style Gallery → Select "Oil Painting"
4. All 5 images get oil painting style
5. Gallery → Review all results
Technique 2: Progressive Enhancement
Build up effects gradually:
1. Start with base image
2. Context → ON (keep it on entire workflow)
3. Add 1: "Subtle color enhancement"
4. Add 2: "Slightly increase contrast"
5. Add 3: "Add gentle vignette"
6. Add 4: "Fine-tune shadows"
7. History → Compare steps
8. Pick best intermediate version
Technique 3: Style Blending
Combine multiple styles:
1. Generate base image
2. Apply: "Cinematic style with moody lighting"
3. Context ON → "Add watercolor texture"
4. Context ON → "Subtle oil painting brush strokes"
5. Result: Unique blended style
Technique 4: Targeted Fixes
Fix specific issues:
1. Open image in viewer
2. Draw on problem areas
3. Close viewer
4. Custom prompt targeting issues:
   - "Fix overexposure in marked area"
   - "Remove blemishes in selected region"
   - "Enhance details in circled area"
Technique 5: A/B Testing
Test multiple approaches:
1. Generate base image
2. Branch A: Quick Edit → "Enhance"
3. Branch B: Style → "Cinematic"
4. Branch C: Custom → Your specific edit
5. Gallery → View all three
6. Compare side-by-side
7. Choose winner
Learning Path
Beginner (Day 1-3)
Focus: Basic features
- Generate images with simple prompts
- Try Quick Edit Commands
- Explore Style Gallery
- Use Image Viewer
- Practice simple edits
Goal: Comfortable with interface
Intermediate (Week 1-2)
Focus: Workflow efficiency
- Master Context modes
- Use Edit History
- Learn Smart Suggestions
- Practice Image Gallery management
- Try keyboard shortcuts
Goal: Efficient editing workflow
Advanced (Week 2-4)
Focus: Professional techniques
- Multi-turn complex edits
- Annotation-based precision
- Style blending
- Batch processing
- Custom workflows
Goal: Professional-grade results
Expert (Month 1+)
Focus: Mastery
- Keyboard-only workflow
- Complex multi-image projects
- Advanced style combinations
- Teaching others
- Contributing techniques
Goal: 10x faster than traditional editors
Frequently Asked Questions
General Questions
Q: Which models support image editing?
A: google/gemini-2.5-flash-image-preview, google/gemini-2.5-flash-image and google/gemini-3-pro-image-preview
Q: Can I edit images from other sources? A: Yes! Upload images and use context mode to edit them.
Q: Is my edit history saved? A: Yes, within the current conversation. Download important versions.
Q: How many images can I generate? A: Based on your account Credits(Current Available Quota). Check Credits >>>
Technical Questions
Q: What image formats are supported? A: PNG (generated), JPG, WebP (viewing/download)
Q: Maximum image size? A: Based on selected aspect ratio (up to 1536×672)
Q: Can I download high-res versions? A: Images are downloaded at generation resolution
Q: Does annotation data persist? A: No, annotations are for guiding the AI, not saved permanently
Usage Questions
Q: Best way to make subtle changes? A: Use "Use Previous One" context mode + specific instructions
Q: How to undo an edit? A: Use Edit History to view and continue from previous versions
Q: Can I save custom styles? A: Currently no, but you can reuse your own prompts
Q: Best practices for batch editing? A: Use "Use Previous Ten" context + clear instructions
Troubleshooting
Q: Edits not applying correctly?
- Check context mode is appropriate
- Be more specific in description
- Try annotation for precise targeting
Q: Gallery not showing images?
- Ensure images were generated (not errors)
- Refresh page if needed
- Check conversation has images
Q: Keyboard shortcuts not working?
- Check no modal is open
- Ensure not typing in input
- Try Cmd/Ctrl variants
Use Cases
Professional Photography
- Portrait retouching
- Landscape enhancement
- Product photography
- Fashion editing
Digital Art
- Concept art creation
- Style exploration
- Character design
- Background generation
Marketing & Social Media
- Social media graphics
- Ad campaign visuals
- Brand imagery
- Content creation
Personal Projects
- Photo enhancement
- Creative exploration
- Gift creation
- Personal branding
E-commerce
- Product shots
- Lifestyle imagery
- Brand aesthetics
- Catalog creation
Get Started Now!
Ready to transform your image editing workflow?
- Select
google/gemini-2.5-flash-imagemodel in Chat >>> - Generate your first image
- Explore the editing tools
- Create something amazing!
Ensur to add an API Key at least with Keys >>>
Last Updated: October 2025
Version: 1.0.0
Feature Count: 11 major features, 100+ capabilities